Showing posts with label work out. Show all posts
Showing posts with label work out. Show all posts
Tuesday, January 20, 2009
Running the Bells - Intense Kettlebell Cardio "Hill" Workouts
Follow @mcphoo
Tweet
When road biking, once a week, hill workouts were the mission. Strength to climb and endure the climb, when the angle is causing the heart to work harder is a great general workout too. Of course one of the great parts is coming down the other side for recovery.
Runners also use hill workouts to help develop speed (short fast steep climbs with lots of recovery) and longer hill climbs like cyclists for endurance/stamina.
It's possible to simulate the cardio aspects of hill workouts with kettlebells both for conditioning, endurance, and, of course, body composition/fat loss. Not sure if it will translate to the speed benefits, but i'd hypothesize there may be some carryover. But let's leave that question aside for the moment and focus on the endurance strength and cardio.
So, here's one way i've found to get a great endurance workout in, similar to my cycling hill workouts, and that may be more enjoyable or engaging than simply swinging for sets.
Running the Bells Set Up
 Here's how running the bells works, and it's pretty simple. First, set the timer on 15 mins. Then, line up a set of bells, for me that's 8, 12, 16, 20, 24. I do 10 swings per bell going up, then come back down 10 each. The point is to keep swinging. That's different than most swing sets for time: it's not X swings then break, or swing for 2 mins then break. It's no break. The recovery is in the coming down the hill - the progressively lighter bells coming back down.
The no. of swings per bell can be varried too if you want to make the hills steeper or the flats longer. You could even line up bells this way if you wanted in a tour de france of varying sizes, eg 8, 12, 12, 16,12,20, 24, sudden drop to 12, 20, 12, 8, 8. Another alternative is to change the counts for the bells, do the number of swings of that size bell. etc.
It's (usually) about Time
What you may want to consider, though, is planning your route before you start. So set up either the bells or the rep scheme (or both) before starting so you have a strategy in mind, and progress you can monitor, and then adjust for the next time. And then keep going for time. You may want to give a run a test drive to see how it feels for you.
You may decide you don't want to work for time - that you say "i just want to run the course 3 times and just see how long that takes me"
For me, going for time may be a hang over from running/cycling, where time is about endurance, and you're looking at the distance covered in that time improving.
But also, when you're thinking about body comp goals, getting longer sets in is a good thing, so if you can do your hills non-stop for 15 mins (that 8 can come in really handy to be able to keep swinging non stop when forearms are no longer able to help hang onto the 24). When you're feeling really good, you can go for more sets. A typical hill workout on the bike was an hour. I'll tell ya, i have not done these hill workouts for that long with KB's. A couple 15 min sets has been it.
Variety, Endurance, Body Comp - and Grip
Running the bells is a way to bring some variety into my kettlebell practice, and let me focus on a different part of my conditioning - stamina/endurance - while burning a whole lot of calories, giving me a hybrid resistance/cardio workout, and hitting the backside and grip all at the same time.
Really - the grip work is not to be underestimated as part of an endurance workout. That just doesn't happen on a bike, and only partially on a rower. This grip work is just one of the many not so hidden benefits of kettlebells.
Let me know if you give Running the Bells a shot and how you find 'em.
mc Tweet Follow @begin2dig
Runners also use hill workouts to help develop speed (short fast steep climbs with lots of recovery) and longer hill climbs like cyclists for endurance/stamina.
It's possible to simulate the cardio aspects of hill workouts with kettlebells both for conditioning, endurance, and, of course, body composition/fat loss. Not sure if it will translate to the speed benefits, but i'd hypothesize there may be some carryover. But let's leave that question aside for the moment and focus on the endurance strength and cardio.
So, here's one way i've found to get a great endurance workout in, similar to my cycling hill workouts, and that may be more enjoyable or engaging than simply swinging for sets.
Running the Bells Set Up
Here's how running the bells works, and it's pretty simple. First, set the timer on 15 mins. Then, line up a set of bells, for me that's 8, 12, 16, 20, 24. I do 10 swings per bell going up, then come back down 10 each. The point is to keep swinging. That's different than most swing sets for time: it's not X swings then break, or swing for 2 mins then break. It's no break. The recovery is in the coming down the hill - the progressively lighter bells coming back down.The no. of swings per bell can be varried too if you want to make the hills steeper or the flats longer. You could even line up bells this way if you wanted in a tour de france of varying sizes, eg 8, 12, 12, 16,12,20, 24, sudden drop to 12, 20, 12, 8, 8. Another alternative is to change the counts for the bells, do the number of swings of that size bell. etc.
It's (usually) about Time
What you may want to consider, though, is planning your route before you start. So set up either the bells or the rep scheme (or both) before starting so you have a strategy in mind, and progress you can monitor, and then adjust for the next time. And then keep going for time. You may want to give a run a test drive to see how it feels for you.
You may decide you don't want to work for time - that you say "i just want to run the course 3 times and just see how long that takes me"
For me, going for time may be a hang over from running/cycling, where time is about endurance, and you're looking at the distance covered in that time improving.
But also, when you're thinking about body comp goals, getting longer sets in is a good thing, so if you can do your hills non-stop for 15 mins (that 8 can come in really handy to be able to keep swinging non stop when forearms are no longer able to help hang onto the 24). When you're feeling really good, you can go for more sets. A typical hill workout on the bike was an hour. I'll tell ya, i have not done these hill workouts for that long with KB's. A couple 15 min sets has been it.
Variety, Endurance, Body Comp - and Grip
Running the bells is a way to bring some variety into my kettlebell practice, and let me focus on a different part of my conditioning - stamina/endurance - while burning a whole lot of calories, giving me a hybrid resistance/cardio workout, and hitting the backside and grip all at the same time.
Really - the grip work is not to be underestimated as part of an endurance workout. That just doesn't happen on a bike, and only partially on a rower. This grip work is just one of the many not so hidden benefits of kettlebells.
Let me know if you give Running the Bells a shot and how you find 'em.
mc Tweet Follow @begin2dig
Monday, December 15, 2008
mc's version of KJ's beast pressing protocol - just fyi
Follow @mcphoo
Tweet
Protocol Review: What do i do?
A few folks have kindly asked exactly what am i doing in this volume protocol for presses i've been writing about recently (here's the latest post). Thanks for reading and for your interest.
 The following is my current rif on KJ's Beast Plan for Presses (described in the RKC manual, 2007, 2008 and the subject of a forthcoming book).
As said, this is a slight variant on the protocol developed by Kenneth Jay. Any compromises to that plan are entirely mine. This post is not a protocol endorsement at all - i'm just experimenting and have not completed that experiment. I'm posting this in the interest of being clear about the method of the approach. I'll continue to report my results, but i'm only a sample of one so far. If you're interested in playing along, by all means, but again, no guarentees :)
With that caveat in place, here we go:
Light Day
As soon as form on the press starts to go south - like a complete rep but needing to put in a hip - go to a lighter bell, and keep going.
I do two 15 min zones. Many challenges within this: getting to 200 reps with perfect form; getting to the complete cycle with the same weight are two good ones.
Heavy Day
Again, i set the 15min timer - not so much because i want to work for 15 mins, but because i want to make *sure* i use the full period for recovery. If i cut that short, the rep fails. That's all there is to it - at least for me. And strength work like this is 2-3 mins. The timer helps me stick to that because i HATE waiting and like to rush to do the next press. For me, that's a doomed strategy, so i use the timer. Then, with heavy bell ready,
Then recovery. Then it's onto partials. reset timer.
So, Kenneth has neat ideas here: if i don't want to do parials with a 4k jump up to the 20, i could do partials with a double bell combination. KJ is a big fan of stacking bells, even if they don't come up to the goal weight of the new bell. Here's where that happens for me: just before one heavy bell looses form.
So, the Partial recipe is to press up with the assist of the other hand, come down to sticking point; press back up; come down a little further, press up; down a little further, press up. This approach to partials is very cool. It works on both sides - where i get down to on each side is a bit different, but it's working.
Two notes on the partials: perfect form.
First, as said, if i feel form is about to get lost, i bail to go to the 16 stacked with another bell, for slightly under the 20 weight, to about an 18. Second, breathing and handle gripping.
Many folks already know this; i've heard it alot too, but it's not until i've really practiced it with this approach that i've gotten how vital it is. For me, it's
There's at least a two day gap between the light day and the heavy day for pressing, so that's *only* once a week for the complete pressing cycle. The other days of the week are currently replete with fighting despair while trying to build up my pistol and pull up, again with heavy/light days per both, snatching once a week (or so) to stay solid with the new RKC snatch test numbers, and a whole lot of rowing thrown in for fun, happiness and alternating steady state/interval cardio. Thanks to KJ there too for pointing out the similarity between rowing and snatching.
Ok, wow, surprised that took so many words to detail, but i hope that helps anyone curious about exactly what i'm doing in these sets. Tweet Follow @begin2dig
A few folks have kindly asked exactly what am i doing in this volume protocol for presses i've been writing about recently (here's the latest post). Thanks for reading and for your interest.
The following is my current rif on KJ's Beast Plan for Presses (described in the RKC manual, 2007, 2008 and the subject of a forthcoming book).As said, this is a slight variant on the protocol developed by Kenneth Jay. Any compromises to that plan are entirely mine. This post is not a protocol endorsement at all - i'm just experimenting and have not completed that experiment. I'm posting this in the interest of being clear about the method of the approach. I'll continue to report my results, but i'm only a sample of one so far. If you're interested in playing along, by all means, but again, no guarentees :)
With that caveat in place, here we go:
Light Day
- pick a weight i can do ten reps with and get ready for multiple sets of five
- set a timer for 15mins (i like the gymboss as a physical device & use it alot, but for a BIG screen version, this freebie javascript page rules.).
- Press strong/best side for 5 - inhale on the press/exhale on the descent. focus on form each rep.
- Press weaker/lesser side for 5
- Put the bell down
- Do TEN bodyweight DeadLifts (so focus on form, in particular, bone rhythm, so that's getting the ass down fast to finish with the knees, exhaling on the out, inhaling on the up. These are done FAST - as fast as can be done to keep that perfect bone rhythm form, yes, but also to keep the heart up to test the effect of integrated cardio)
- mark down complete set with a | in a workout book.
- Take a breath
As soon as form on the press starts to go south - like a complete rep but needing to put in a hip - go to a lighter bell, and keep going.
I do two 15 min zones. Many challenges within this: getting to 200 reps with perfect form; getting to the complete cycle with the same weight are two good ones.
Heavy Day
Again, i set the 15min timer - not so much because i want to work for 15 mins, but because i want to make *sure* i use the full period for recovery. If i cut that short, the rep fails. That's all there is to it - at least for me. And strength work like this is 2-3 mins. The timer helps me stick to that because i HATE waiting and like to rush to do the next press. For me, that's a doomed strategy, so i use the timer. Then, with heavy bell ready,
- i do my C&P on the strong side; park the bell.
- Pause for a breath to feel in the zone.
- Do my C&P on the weaker side. park the bell.
- Do z health drills during the recovery period.
- make SURE the full recovery period has passed.
- Repeat.
Then recovery. Then it's onto partials. reset timer.
So, Kenneth has neat ideas here: if i don't want to do parials with a 4k jump up to the 20, i could do partials with a double bell combination. KJ is a big fan of stacking bells, even if they don't come up to the goal weight of the new bell. Here's where that happens for me: just before one heavy bell looses form.
So, the Partial recipe is to press up with the assist of the other hand, come down to sticking point; press back up; come down a little further, press up; down a little further, press up. This approach to partials is very cool. It works on both sides - where i get down to on each side is a bit different, but it's working.
Two notes on the partials: perfect form.
First, as said, if i feel form is about to get lost, i bail to go to the 16 stacked with another bell, for slightly under the 20 weight, to about an 18. Second, breathing and handle gripping.
Many folks already know this; i've heard it alot too, but it's not until i've really practiced it with this approach that i've gotten how vital it is. For me, it's
- inhale going up; exhale coming down - it's just smoother, more in control - for me, anyway.
- grip the handle especially if in grief on going up. When i've felt my weaker side pushing through the sticking point, gripping the handle with extra force on the heavy day, and towards the end of the light day, helped keep the form groove.
There's at least a two day gap between the light day and the heavy day for pressing, so that's *only* once a week for the complete pressing cycle. The other days of the week are currently replete with fighting despair while trying to build up my pistol and pull up, again with heavy/light days per both, snatching once a week (or so) to stay solid with the new RKC snatch test numbers, and a whole lot of rowing thrown in for fun, happiness and alternating steady state/interval cardio. Thanks to KJ there too for pointing out the similarity between rowing and snatching.
Ok, wow, surprised that took so many words to detail, but i hope that helps anyone curious about exactly what i'm doing in these sets. Tweet Follow @begin2dig
Monday, December 1, 2008
The Perfect Rep - and the role of volume with form.
Follow @mcphoo
Tweet
This post is a reflection on one aspect that contributes to the experience of the perfect rep: high volume. It's only one part, but i'd like to unpack a bit of why that part, at least for myself, and a rather new understanding of "volume" is becoming such a key part of "perfect."
One of the first things that struck me in reading Pavel's work like Enter the Kettlebell is the emphasis on "the perfect rep." Don't go to failure; don't do so many reps that form goes to hell. Stay fresh. Make every rep perfect.
But what is the "perfect rep"? And how do we know if we have one?
This may not be your experience, but i've interpreted this "perfect rep" thing as getting the form right mechanically, and executing with the correct weight for the correct sets and moving on, eg doing the ladders for ETK's ROP. Upon reflection, though, that progression doesn't sound much like an experience of "perfection," does it? Sure one feels good after doing the workouts, and yes progress most emphatically occurs. But is it "perfection?" And why is experiencing perfection so important? would i know it if i did encounter it?
Some time ago i wrote about how seeing Will Williams doing the kettlebell front squat - in particular the breathing to go with that move - stopped me in my tracks as seeming effortless and perfect. I'd described it as what i'd understood art to be about, when a move goes from the mechanistic to the graceful.
The parts of perfection. Last week or so, looking at the kettlebell front squat, i came back to the front squat, going over how zhealth breaks down the concept of efficient movement into four parts that seems to be a recipe for the perfect rep:
What's been hitting me of late as a key feature of even getting into step one - hitting the target/perfect form - is volume by repetition. In other words, tons of reps. Which means lighter weights.
What's a Rep, really? Generally speaking, i've thought of reps as simply reps within a set, and that volume is just whatever you get from the total reps x mass for a particular workout. Increasing reps, especially when focusing on strength, has seemed just the wrong way to think about it, too: loads of reps is endurance strength, not power strength, heh we want POWER to PRESS. And it seems many protocols for strength reinforce this. For instance, in Charles Staley's excellent Escalating Density Training, in your 15 min. blocks, once you get 70reps inside a set, pretty much time to up the weight. What more is there to volume than that? Over the weekend, talking with Suleiman Al-Sabah about our mutual pressing goals, Al encouraged me again to think about doing "lots of reps" and reminded me of Kenneth Jay's part of the RKC manual on building strength. So i went to have a bit of a re-read.
The rationale for volume by rep: Kenneth talks about the need to do lots and lots of reps at a weight that can be readily sustained for lots and lots of reps to build up the neurological patterns of what that move is. The caveat to this volume, of course, is that you have to know what the correct form is to be repeated. See that RKC instructor.
Assuming that instruction has taken place, the rationale here for upping volume as half the strategy to strength is that this repetition neurologically groves the pattern of performance for building up the weight. To this end, Kenneth has Low Volume and High Volume days: lost of reps at lighter weight for grooving the pattern vs fewer (perfect) reps at higher weights to develop load.
Patterning is important. I've been focusing on the importance of patterning within z health practice - in terms of healing movement patterns, and taking those patterns from the level of conscious effort to unconscious habit. Over the weekend, i'd decided to focus just on my suitcase dead-lift form with KB's, using the EDT 15 min approach: the sDL's for the first exercise; floor presses for the second. For the sDL's I used a weight about half of what i usually use for such sets, just to focus on rep quality. The main points of concern, like that front squat for hitting the target meant correct head and eye position throughout the move, correct knee position, correct hip hinge, correct butt backness, and doing all this with bone ryhthmn. That's a lot to do. The cool thing that happened was that when everything was firing together, the rep simply felt better: more effective, more efficient, like all the parts working as one thing rather than as a bunch of joints and muscles trying to achieve something. Sadly by the time i was actually finished the 15 mins, and the sets of 5 reps were starting to really connect, (a) the time was up but (b) i was just starting to feel fatigued. Good time to stop, right? And keen desire to do it again. Oh, and i felt that workout the next day, too.
It's funny how when you need to hear something, you keep hearing it over and over, eh? At least i find this. It's like the opposite of a nightmare where you keep having the same monster, only bigger, until you stop turn around and look at the monster and say "can i help you?"
An Example of Rep Volume in Action. The Sneaky sneaky Way of the RKC. It was in the afternoon, after this morning workout, that i had the meet with Al and his recommendation of "lots of reps" and a reread of Kenneth Jay. And in rereading that section, i recollected one of the most profound experiences of the RKC cert: connecting with the swing. Indeed, i had a revelation of what the hardstyle swing form was, compared to how i'd interpreted and executed previous instruction. I felt i *got it* from "firing the lats" to getting the energy down into the ground. it was ah ha, ah ha, ah ha. I left the cert feeling pretty good about that swing, and could hardly wait to share these refinements with others.
How did that happen? Repeated instruction i'd thought and such attention on form over several days, but - i see it all now - the other key ingredient: lots and lost of reps. LOTS. Sneaky sneaky. Every 20mins over three days a timer went off and we were doing swings. And those were just the regularly scheduled ones. Any opportunity for pause was filled with swings, using a bell weight that enabled a perfect rep from first to last. So combine that volume with constant supervision to tweak and correct form, yes we'd better leave with a dang good sense of the swing. The other day i was quietly delighted when i was demo'ing a swing, the trainee laughed. I asked why. He said "well it's so right - the swing - that's what it's supposed to look like." With the instruction, it's the reps, isn't it.
Putting it together: More Reps Are Alright, Jack.
It's taken me till today to put it together that it's just this type of volume with focus on form that, ya, does embed the move in the body. And more, it does provide the basis for increasing the load, just as KJ and Pavel have said. As proof positive, half way through the cert, with the encouragement of team assistant instructor Lynda Angeles, i was double swinging 24s with proper form. That effort with that load would not have been possible - it was certainly not imaginable - prior to this halfway point in the three days of swings marvelous swings.
The take away at least for this first step towards a perfect rep, of Hitting the Target, is indeed doing what it takes to get in the volume of reps. This is not using a sissy weight. Pavel would not have let us get away with this during the RKC, but as KJ says in the RKC manual talking about presses: using a weight you can do for 5-15 reps, and if you're doing 15 reps, your high volume day better be 200/side.
I used to think of light days as just a way to keep effort alive and not burn out from higher work volume. Ho hum. I now find myself energized and looking forward to these high volume lighter weight days as an opportunity to have that form *click* in those moves where i've had instruction, and can monitor myself to feel that connection.
Hope if you've had questions about the role of volume of reps, these reflections might help you too experience where the path to the perfect rep, after instruction and knowledge of proper form, is aided immensely by rep volume.
Note: do look at Mike's comments below on fascial adaptation - and the recommendation to change up trunk positions for HIGH volume (thanks Mike).
 Book Plug: Kenneth Jay in the New Year.
Now if you don't have an RKC certification manual to read up on Kenneth's approach to the press, fear not. A book is coming in the new year to focus says Kenneth on, perhaps not surprisingly, the perfection of the press, the pistol and the pull up. In the meantime, happy repping.
update: the quest for the perfect strength rep through volume continues, charting the course here. Tweet Follow @begin2dig
One of the first things that struck me in reading Pavel's work like Enter the
Kettlebell is the emphasis on "the perfect rep." Don't go to failure; don't do so many reps that form goes to hell. Stay fresh. Make every rep perfect.But what is the "perfect rep"? And how do we know if we have one?
This may not be your experience, but i've interpreted this "perfect rep" thing as getting the form right mechanically, and executing with the correct weight for the correct sets and moving on, eg doing the ladders for ETK's ROP. Upon reflection, though, that progression doesn't sound much like an experience of "perfection," does it? Sure one feels good after doing the workouts, and yes progress most emphatically occurs. But is it "perfection?" And why is experiencing perfection so important? would i know it if i did encounter it?
Some time ago i wrote about how seeing Will Williams doing the kettlebell front squat - in particular the breathing to go with that move - stopped me in my tracks as seeming effortless and perfect. I'd described it as what i'd understood art to be about, when a move goes from the mechanistic to the graceful.
The parts of perfection. Last week or so, looking at the kettlebell front squat, i came back to the front squat, going over how zhealth breaks down the concept of efficient movement into four parts that seems to be a recipe for the perfect rep:
- perfect form - hitting the target
- dynamic postural alignment.
- synchronized respiration
- balance tension and relaxation
What's been hitting me of late as a key feature of even getting into step one - hitting the target/perfect form - is volume by repetition. In other words, tons of reps. Which means lighter weights.
What's a Rep, really? Generally speaking, i've thought of reps as simply reps within a set, and that volume is just whatever you get from the total reps x mass for a particular workout. Increasing reps, especially when focusing on strength, has seemed just the wrong way to think about it, too: loads of reps is endurance strength, not power strength, heh we want POWER to PRESS. And it seems many protocols for strength reinforce this. For instance, in Charles Staley's excellent Escalating Density Training, in your 15 min. blocks, once you get 70reps inside a set, pretty much time to up the weight. What more is there to volume than that? Over the weekend, talking with Suleiman Al-Sabah about our mutual pressing goals, Al encouraged me again to think about doing "lots of reps" and reminded me of Kenneth Jay's part of the RKC manual on building strength. So i went to have a bit of a re-read.
The rationale for volume by rep: Kenneth talks about the need to do lots and lots of reps at a weight that can be readily sustained for lots and lots of reps to build up the neurological patterns of what that move is. The caveat to this volume, of course, is that you have to know what the correct form is to be repeated. See that RKC instructor.
Assuming that instruction has taken place, the rationale here for upping volume as half the strategy to strength is that this repetition neurologically groves the pattern of performance for building up the weight. To this end, Kenneth has Low Volume and High Volume days: lost of reps at lighter weight for grooving the pattern vs fewer (perfect) reps at higher weights to develop load.
Patterning is important. I've been focusing on the importance of patterning within z health practice - in terms of healing movement patterns, and taking those patterns from the level of conscious effort to unconscious habit. Over the weekend, i'd decided to focus just on my suitcase dead-lift form with KB's, using the EDT 15 min approach: the sDL's for the first exercise; floor presses for the second. For the sDL's I used a weight about half of what i usually use for such sets, just to focus on rep quality. The main points of concern, like that front squat for hitting the target meant correct head and eye position throughout the move, correct knee position, correct hip hinge, correct butt backness, and doing all this with bone ryhthmn. That's a lot to do. The cool thing that happened was that when everything was firing together, the rep simply felt better: more effective, more efficient, like all the parts working as one thing rather than as a bunch of joints and muscles trying to achieve something. Sadly by the time i was actually finished the 15 mins, and the sets of 5 reps were starting to really connect, (a) the time was up but (b) i was just starting to feel fatigued. Good time to stop, right? And keen desire to do it again. Oh, and i felt that workout the next day, too.
It's funny how when you need to hear something, you keep hearing it over and over, eh? At least i find this. It's like the opposite of a nightmare where you keep having the same monster, only bigger, until you stop turn around and look at the monster and say "can i help you?"
An Example of Rep Volume in Action. The Sneaky sneaky Way of the RKC. It was in the afternoon, after this morning workout, that i had the meet with Al and his recommendation of "lots of reps" and a reread of Kenneth Jay. And in rereading that section, i recollected one of the most profound experiences of the RKC cert: connecting with the swing. Indeed, i had a revelation of what the hardstyle swing form was, compared to how i'd interpreted and executed previous instruction. I felt i *got it* from "firing the lats" to getting the energy down into the ground. it was ah ha, ah ha, ah ha. I left the cert feeling pretty good about that swing, and could hardly wait to share these refinements with others.
How did that happen? Repeated instruction i'd thought and such attention on form over several days, but - i see it all now - the other key ingredient: lots and lost of reps. LOTS. Sneaky sneaky. Every 20mins over three days a timer went off and we were doing swings. And those were just the regularly scheduled ones. Any opportunity for pause was filled with swings, using a bell weight that enabled a perfect rep from first to last. So combine that volume with constant supervision to tweak and correct form, yes we'd better leave with a dang good sense of the swing. The other day i was quietly delighted when i was demo'ing a swing, the trainee laughed. I asked why. He said "well it's so right - the swing - that's what it's supposed to look like." With the instruction, it's the reps, isn't it.
Putting it together: More Reps Are Alright, Jack.
It's taken me till today to put it together that it's just this type of volume with focus on form that, ya, does embed the move in the body. And more, it does provide the basis for increasing the load, just as KJ and Pavel have said. As proof positive, half way through the cert, with the encouragement of team assistant instructor Lynda Angeles, i was double swinging 24s with proper form. That effort with that load would not have been possible - it was certainly not imaginable - prior to this halfway point in the three days of swings marvelous swings.
The take away at least for this first step towards a perfect rep, of Hitting the Target, is indeed doing what it takes to get in the volume of reps. This is not using a sissy weight. Pavel would not have let us get away with this during the RKC, but as KJ says in the RKC manual talking about presses: using a weight you can do for 5-15 reps, and if you're doing 15 reps, your high volume day better be 200/side.
I used to think of light days as just a way to keep effort alive and not burn out from higher work volume. Ho hum. I now find myself energized and looking forward to these high volume lighter weight days as an opportunity to have that form *click* in those moves where i've had instruction, and can monitor myself to feel that connection.
Hope if you've had questions about the role of volume of reps, these reflections might help you too experience where the path to the perfect rep, after instruction and knowledge of proper form, is aided immensely by rep volume.
Note: do look at Mike's comments below on fascial adaptation - and the recommendation to change up trunk positions for HIGH volume (thanks Mike).
Book Plug: Kenneth Jay in the New Year. Now if you don't have an RKC certification manual to read up on Kenneth's approach to the press, fear not. A book is coming in the new year to focus says Kenneth on, perhaps not surprisingly, the perfection of the press, the pistol and the pull up. In the meantime, happy repping.
update: the quest for the perfect strength rep through volume continues, charting the course here. Tweet Follow @begin2dig
Friday, October 10, 2008
How many repetitions should i do of this mobility drill?
Follow @mcphoo
Tweet
Since starting to do Z training with folks, i get asked "how many times should i do this drill?" or "how frequently do i need to do that drill."
 The cool thing about these Z drills - dynamic joint mobility - is that they are not just moving a joint through its range of motion to keep it healthy, these drills are hitting the thousands and thousands of mechanoreceptors around the joints, and adapting to those messages, as in the all pervasive principle of specificity (SAID). That's one.
Another one is what Courtney Neupert has been telling me about the application of Wolff's Law, or that bone and tissue get reshaped based on the load/stresses placed upon them, all part of the "continuous cycle of osteoclastic/osteoblastic activity - old bone gets eaten up while new bone tissue is formed. " And how that new bone is formed responds to these new patterns. Likewise, Courtney reminds me, tissue. That adaptation can result in hypertrophy (a good thing) or tight shoulders (not so good), all adaptations to load.
So that's SAID and Wolff, but there's also another, which doesn't seem to have a punchy name or acronym. It's called "motor learning" and back in 67 Fitts and Posner proposed three stages for motor learning: cognitive, associative and autonomous. Within 1000 reps one is still learning a skill, having to bring conscious (cognitive) attention to it. Within 1000 - 10,000 and beyond, one is making fewer mistakes, is aware of them, knows how to correct them. By 100 thousand to 300 hundred thousand, one can perform a move without thinking about it - autonomously.
So let's go back to that question of how frequently one should be practicing a joint mobility move.
We know that with SAID, we adapt readily to imposed demand, and that with Wolff's Law, repeating those loading patterns re-builds us according to these new patterns. With these effects, we'll want to get into practicing these SAID/Wolff patterns perfectly. And we know with motor learning, it takes about 1000 reps just to learn that pattern, and tens of thousands to perform it well.
Therefore, repetitions to remodel (and counteact other imperfec t repetitions going on in our long standing autonomous actions like walking) need to be high, and repetitions just to learn the move also need to be high.
If you're a westerner, for instance, who's learned to use chopsticks as an adult, think of how many openings and closings of the sticks it may have taken just to have gotten the hang of it, and ask yourself if you're at the associative stage yet or truly autonomous where using these is a comfy and thought-less as using a fork.
So, in answer to the question of how frequently one should perform a drill, an answer may be "as frequently as you want," with the understanding that given the numbers of repetitions necessary to learn, repattern and remodel, the more perfect reps, the more often, the faster the desired change will be effected.

The key marker here is perfect rep: do a set for as many reps as can be done perfectly (maybe 3-5) then pause, redo. Better to do many times a day than all at once and fall into poor form, since it's that form that is creating what is learned and the pattern of the adaptation. Getting to the perfect rep faster to optimize that learning is another reason to see a trainer to tune your approach. You can find an international list of Z trainers on the Z site. Tweet Follow @begin2dig
The cool thing about these Z drills - dynamic joint mobility - is that they are not just moving a joint through its range of motion to keep it healthy, these drills are hitting the thousands and thousands of mechanoreceptors around the joints, and adapting to those messages, as in the all pervasive principle of specificity (SAID). That's one.Another one is what Courtney Neupert has been telling me about the application of Wolff's Law, or that bone and tissue get reshaped based on the load/stresses placed upon them, all part of the "continuous cycle of osteoclastic/osteoblastic activity - old bone gets eaten up while new bone tissue is formed. " And how that new bone is formed responds to these new patterns. Likewise, Courtney reminds me, tissue. That adaptation can result in hypertrophy (a good thing) or tight shoulders (not so good), all adaptations to load.
So that's SAID and Wolff, but there's also another, which doesn't seem to have a punchy name or acronym. It's called "motor learning" and back in 67 Fitts and Posner proposed three stages for motor learning: cognitive, associative and autonomous. Within 1000 reps one is still learning a skill, having to bring conscious (cognitive) attention to it. Within 1000 - 10,000 and beyond, one is making fewer mistakes, is aware of them, knows how to correct them. By 100 thousand to 300 hundred thousand, one can perform a move without thinking about it - autonomously.
So let's go back to that question of how frequently one should be practicing a joint mobility move.
We know that with SAID, we adapt readily to imposed demand, and that with Wolff's Law, repeating those loading patterns re-builds us according to these new patterns. With these effects, we'll want to get into practicing these SAID/Wolff patterns perfectly. And we know with motor learning, it takes about 1000 reps just to learn that pattern, and tens of thousands to perform it well.
Therefore, repetitions to remodel (and counteact other imperfec
t repetitions going on in our long standing autonomous actions like walking) need to be high, and repetitions just to learn the move also need to be high.If you're a westerner, for instance, who's learned to use chopsticks as an adult, think of how many openings and closings of the sticks it may have taken just to have gotten the hang of it, and ask yourself if you're at the associative stage yet or truly autonomous where using these is a comfy and thought-less as using a fork.
The key marker here is perfect rep: do a set for as many reps as can be done perfectly (maybe 3-5) then pause, redo. Better to do many times a day than all at once and fall into poor form, since it's that form that is creating what is learned and the pattern of the adaptation. Getting to the perfect rep faster to optimize that learning is another reason to see a trainer to tune your approach. You can find an international list of Z trainers on the Z site. Tweet Follow @begin2dig
Monday, September 8, 2008
Why Attend the Minnesota ZHealth Workshop: move better, feel better - really (a workshop preview)
Follow @mcphoo
Tweet
 Want to last longer, move better, reduce pain? At the end of october - in fact, that's halloween (Oct. 31) to Nov 2 - Dragon Door is hosting a Z-Health workshop called " Z-Health
The Essential Secrets of Elite Performance" for Athletes. Athletes is a term defined broadly: if you move, and want to improve your movement - your athletic effort - you're an athlete.
Why would you want to attend this workshop? There's a couple of big reasons:
(1) If you're an athlete who suffers from any kind of ache, tweak or out and out pain, and have repeatedly hit the manual therapists' offices - whether chiro, massage or similar, the approach presented in ZHealth (or Z-Health or Z Health) will help. That's a bold claim. It's true and i'll come back to it.
(2) If you're an athlete who's hit a plateau, you'll learn skills that will help you tune your performance in what are likely very new ways - unless you're already working with a trainer certified in the Z approach that will help you move past your plateau.
(3) if you're an athlete who needs good hand/eye coordination for your sport, believe it or not, you'll improve it.
(4) If you're an athlete learning a new sport or have been playing a particular sport for awhile, the workshop will help you move with more efficiency. More efficiency means more power, speed - more of what's good for your game. The same goes for whether you're a powerlifter, kettlebell'er or hockey player.
You may say, ok, those sound like incremental improvements. So what?
On the one hand, the answer might be well, increments are what it's all about in sport: in the recent olympics, the difference between a world and olympic record in the 200m men's sprint was 2/10ths of a second. it took almost a generation to beat that record, too. You may say well you're not competing at that kind of elite level; those kind of increments don't mean much to you.
OK. If getting better measurable gains in your activity is not important to you, that's fine. For instance, you mayn't care that you can walk your circuit faster; you just want to keep doing it.
So therefore, on the other hand, that's the other rationale for improving efficiency: improving function while reducing wear and tear on the body. If we move with more efficiency, we're using our bodies more effectively. That means less energy is put into that movement, which means we have more energy for other things. Likewise, that efficiency means better use of our limited resource - ourselves - which means fewer problems over the long haul.
A Stitch in Time Saves Nine
One of the things we learn about in human physiology is that we're internally extremely well connected - a tweak that starts in the foot can effect the knee, can effect the hip, can trigger the back, can bug the shoulder, can screw up the jaw, can hurt the head. The cumulative effect of these little things can mean at the least less effective, efficient movement and at the worst means a whole host of pain, and a set up for problems like injuries in the movements to come.
The z approach takes this science of our wiring and shows us how to tune our movement to create the clearest path, the freest signal through that wiring so that we can work as effectively as possible. That efficiency means better performance, reduced pain. It's freaky how these things connect, and how quickly the effect can be demonstrated.
The Missing Manual
One of the biggest drags about us is that we don't come with The Manual.
I used to work a lot on motorcycles - this was necessary as i could only afford ones that were made a decade or more before the period in which i was riding them, and so, that telling you something about my finances, i had to be able to maintain them. One of the best resources for this up keep was (a) canadian tire, home of many parts that could be jury-rigged into working and (b) clymer manuals on how these things fit together - both the mechanicals and the all-important electrics. Without these manuals, hacking around the bike to try to tune it was just guess work. If it worked, it was often more luck than knowledge.
We don't come with Clymers. Netter's Anatomy and Guyton and Hall's Physiology while great texts on body parts and discrete physical systems, ain't great when it comes to seeing how, to put it loosely, the mechanical interacts with the electrics.
Without such a manual, what we often do in our own training, especially those of us who do not have coaches, is our best guess hacks. We read the articles, maybe follow some forums, watch friends, and try to put together an effective approach to get results, from getting the right gear to applying "correct" form. But how do we know what we're doing *is* actually right? is actually good for us? We're extremely complex, highly adaptive systems. We take tons of abuse, from poor eating to high heel shoes and keep functioning. So sometimes it's hard to tell if what we're doing is wrong - especially if we seem to be making progress. But at what cost progress? Perhaps if you're making loads of gains and are completely pain-free (either during or apart from your activity), you've lucked out and are operating optimally. Way to go. For the rest of us, well, there's this tension we get in the neck, or the back kinda aches, or sometimes when we walk our knee hurts. Pavel has this comment on his seminar with Charles Staley "Put up your hands anyone who's had a shoulder injury. Anyone who hasn't put up their hands, can't"
Anyone who's been in pain, and been helped out of it knows how much better their activities or daily lives are. For some of us, we go to manual therapies, and feel great for a time once we're off the table. For some, that treatment's enough. For many of us, we have to keep going back to get that release.
For all of us in such tweaked categories, getting a manual to deal with these tweaks proactively can make a world of difference to our performance - on and off the field; in and out of the gym.
Demystifying Movement
In the Z approach, athletes get a broader view of movement than muscle. After all, we have bones, muscles, nerves, but we also have sensory and perceptual functions or various systems that maintain those bones muscles and nerves in space. Without these we couldn't stay upright, little own move. The Z approach takes each of these components into account when talking about tuning movement.
Some folks think that Z is about joint mobility: that its thing is just to focus on moving the bendy bits instead of manipulating muscles, like other folks do.
In my experience of Z the answer is yes and no. Yes, the initial approach (Day 1 of the workshop, R Phase focus) is HUGE on getting full range of motion around joints, but the focus on joints is there as a powerful means to an end. The real meat and potatoes of the this initial phase is about what's happening around those joints with our nervous system, particularly with mechanoreceptors. Joints have more of these awareness detectors than any other part of the body. If one part of the body is having issues with its reception, the ENTIRE rest of the body responds. You'll see a demo that shows a problem with a thumb - no pain, but a less than fully mobile joint - will substantially, hugely shut down the ability of the hamstrings to generate force, but how freeing up that thumb joint will bring that strength back. That improvement in strength had nothing to do with building mass; it had to do with improving the signal path from a seemingly unrelated joint back to the brain - to give the all clear for that joint.
Bottom line of R: decreased joint mobility (a joint that cannot move through full range of motion), decreased strength; increased mobility, increased strength.
In Day 2 with I phase, the focus moves from the joints' relation to movement into how our visual and vestibular systems - balance, eye tracking and so on effect movement.
The S part of the workshop begins to put these components together into movement practice for coordinated benefit.
THE GOODS
The workshop promo uses terms like "massive" development of power and "immediate" strength gains. These sound very much too good to be true, don't they? And (to me, unfortunately) the workshop also talks about "revealing secrets" to making these gains.
For the Less Trained. The thing is, if you haven't worked with a coach before ANY good coach will help you improve your performance - likely immediately. And if you haven't worked with a coach before, they may even break your current personal best in one session. So i'm not too moved by such claims. So on the grossest level, if you take this seminar you will definitely learn stuff to improve your performance, and you will see benefits right away. But what differentiates this approach from perhaps others is the longer haul: there are many many carry over effects of the whole Z approach that go beyond sport specific training.
If you learn how to squat right, for instance, you learn how to do this one activity well. If, however, you learn how to stand in balance on your bones, using as little energy as possible to hold a "long" spine, you have a foundation for effective powerful movement in any movement/activity (on day 3, if you're a kettlebeller, ask about "femur snap rather than hip snap" in the swing/snatch).
For the More Coached/Trained. If you have worked with coaches before, or do so right now, then you know how precious any gains can be. If your coaching/training has focused on mainly muscle work, it doesn't take a big leap of the imagination to get that if you can bring on board the other systems of the body like proprioception, like the vestibular and visual systems, that you're going to do better, harmonizing more of what the body has to offer to improve performance. Check out Mike T Nelson's posts about deadlift improvements with Z approaches for more.
For Those With Pain or Injury. If you've had an injury or are coping with one now, you'll know how valuable it can be to get out of pain so you can get back to your training. You may see a specialist to treat your ills and feel great while that happens. But have you asked yourself why do you have to keep going back to feel well? Do you believe that you will have to keep going to feel well? Would you like to explore the options of how you could take care of yourself such that you could get out of the treatment cycle?
If you are in pain, and would like that attended, may i recommend booking an appointment during the weekend with Dr. Cobb who will be delivering the workshop? He can assess and point you to a proactive plan for your own well being. It's worth it.
IN SUM
If you are keen to make your body last as long as possible pain free, running effectively, and efficiently, and if you want to improve your athletic performance, the skills you'll learn over these three days will literally last a life time.
Note for Instructors: if you're a trainer and want to learn how to provide these kinds of techniques for your clients, as well as how to do assessments of performance, you may want to consider taking in a Z-Health certification course rather than this workshop (here's a review of my experience with the first z-health cert, r-phase). Tweet Follow @begin2dig
Monday, August 25, 2008
Increase the Weight and Challenge of your KB's: Kneel!
Follow @mcphoo
Tweet
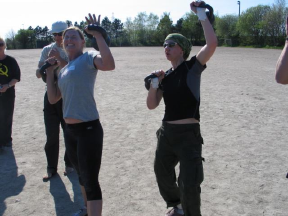
Some have shown that if you want a cheap way to increase the weight of your upper body Kettlebell work, go "bottom's up": hold the handle so the butt of the bell is in the air, rather than hanging down. Here's another that can increase the effort on your presses, whether with dumbbells or kettlebells: kneel. If you want to challenge your stability as well as strength, genuflect.
Taking the legs out of the equation to induce more of an upper body challenge is not new: Pavel Tsatsouline in More Russian Kettlebell Challenges uses various seated presses; Mike Mahler does likewise at least once in most of his DVDs.
The difference is that these are seated variants, and kneeling is the kind of halfway house between standing and sitting; kneeling vs genuflecting provides even more opportunities for working balance and motion. In the CK-FMS, more about these challenges are taught as corrective strategies for mobility and stability.
But even without such study, you can give kneeling/genuflecting a try: you'll be surprised no doubt at how the bell you feel comfortably challenged pressing from your feet becomes impossible on one's knees.
This simple positional change adds a radical new dimension to one's training. I'm personally blown away by how an adaptation that costs nothing gives me a whole new way to practice familiar moves with a new perspective, as shown by Rif here
Give it a try. Let me know what you find.
Tweet
Follow @begin2dig
Taking the legs out of the equation to induce more of an upper body challenge is not new: Pavel Tsatsouline in More Russian Kettlebell Challenges uses various seated presses; Mike Mahler does likewise at least once in most of his DVDs.
The difference is that these are seated variants, and kneeling is the kind of halfway house between standing and sitting; kneeling vs genuflecting provides even more opportunities for working balance and motion. In the CK-FMS, more about these challenges are taught as corrective strategies for mobility and stability.
But even without such study, you can give kneeling/genuflecting a try: you'll be surprised no doubt at how the bell you feel comfortably challenged pressing from your feet becomes impossible on one's knees.
This simple positional change adds a radical new dimension to one's training. I'm personally blown away by how an adaptation that costs nothing gives me a whole new way to practice familiar moves with a new perspective, as shown by Rif here
Saturday, August 23, 2008
Pull Ups: How To Do Pull Ups Resources (Pull Ups 101)
Follow @mcphoo
Tweet
What muscles do pull ups work? How increase number of pull ups: with weights or reps? How achieve that first pull up? What's Pavel's Fighter Pull Up Program? What's the difference between a chin up and a pull up? These topics and more looked at in this post.
For many, the quest to perform a single pull up is a Big Deal. For gals especially, where are upper body strength is at a disadvantage relative to the males of the species, achieving a single body weight pull up is to have reached a critical pinnacle of success. Indeed, in the RKC School of Strength, a key test for men and women as Level 2 instructors is the single Tactical Pull Up: dead hang, pull up so neck touches the bar. Must be completed once, men and women alike.
Methods a Plenty. Fortunately, for something perceived to be such a mark of fitness accomplishment, there are almost as many methods to training to achieve a pull up as there are people blogging about pull ups. Just a reminder, the pull up and chin up are distinguished by the hand grip: the pull up is pronated (palms facing away); the chin up is supinated (palms facing).
The purpose of this post is to go over a few of the many resources where i've heard back from folks i trust to say they actually work.
The Prime Movers of the Pull Up. Before getting into technique, it's worth reviewing what's going on mechanically in the pull up: that can help focus on what we need to be working to make progress (excuse me if this is going over what are basics for you).
 Some folks would look at the pull up and say that's arm work: need big biceps to pull yourself up. Indeed, pull ups can be very good for the biceps. The rear delts also come into play. Mainly, however, the pull up works the back. In particular it really works the Lats, or latissimus dorsi one of the largest muscles in the body. Some folks may be skeptical about focusing on the lats rather than the bi's for pull ups. Charles Staley motivates the comparison this way "if you load your bodyweight onto a bar, how many times can you curl it? I’m guessing 0."
Why are the lats more vital than the biceps in the Pull Up? Let's take a sec to consider the connections of the muscles. The biceps for sure are elbow flexors. And yes, pulling UP means flexing the elbows.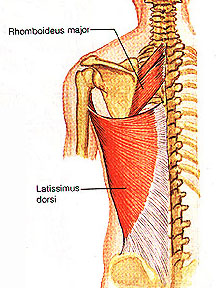 BUT the lats also enable the trunk to be pulled up via shoulder (or glenohumeral joint) extension. How does that work? The lat is like a big triangle of tough stretchy stuff that is nailed down along the spine from the middle of the back, just under the shoulder blade, right down into the butt at the sacrum. That's a lot of back. So the mid thoracic spine is one point on the triangle; the sacrum is the second, and the third is in the arm, on the "medial side of the intertubercular groove of the humerus"
The lat connected in this way supports four movements of the shoulder joint: extension (movement of the humerus straight, posteriorly), bringing it across and in front of the body (adduction); internal rotation (putting your lower arm behind your back); bringing your arm up and around so that you can grab the opposite shoulder to the upraised arm (horizontal abduction).
So the biggie move of the lat in the pull up is to get that arm back down by your side. Remember, it's huge area is pulling from the mid back down to the butt, all focused on that single spot in the arm. That's a lot of reef.
Compare that amount of pulling area from the lats into the shoulder against the biceps into the elbow, and it's really no contest. Staley's visualization hits home: trying to biceps curl bodyweight (biceps focus in the pull up) vs pulling bodyweight (lat focus). Intriguingly, we also get an insight into why chin ups are "easier" than pull ups: with a chin up (supinated) grip, we have a more typical curl going, working flexors as well as biceps.
Thinking through the Movement. We can get in the way of our own pull up progress by focussing too much on the biceps and not enough on firing those massive lats. Below are a few techniques to visualize pulling from the lats. If the goal is to focus on the lats rather than biceps, a well known, powerful technique to focus muscle firing is visualization. Powerlifter Jerry Nicolas talks about doing a pull up imagining that the elbows connected to the sides by cables, so that when you're hanging from the bar, the cables are extended; getting up to the bar, the sides are reeling up the cable, raising your body. Charles Staley uses a similar visualization:
Aside: Contrasting Lat Pull Downs with Pull ups. Going deeper into not just what muscles are fired on the gross level, but on the micro level, some people wonder whether doing lat pull downs aren't the same as pull ups, except in reverse. The short answer is "no." Two quicky reasons: (1) hanging in space requires different neuro muscular adaptations (different numbers and patterns of muscle fibers recruited within the same muscle) than sitting on a bench and (2) based on Stuart McGill's research (see Ultimate Back Fitness and Performance) on how evil and unnatural sitting is for your back especially, do you *ever* want to do seated resistance work - of any kind?
Enough! Just tell me how to get up! So now that the muscle work is sussed, and the visualizations are worked out, how to get the physical work happening.
IF you can do One or More Pull Ups
Gold Standard: Clarence Bass describes Pavel Tsatsouline's Buddy Ladders. These are expanded in more detail as the Fighter Pull Up sequence (pdf only), also by PT. Each of these sequences is based on a ladder going up: do 1, pause. do 1, 2. pause. do 1,2,3 etc. This simple approach has been shown time and time again to have powerful effects.
Now, i have to say that i have plateaued with ladders at 7, so went looking for alternative approaches. Roland Fisher, a trainer in Alberta i really respect, pointed out a cool program in, yes, a Men's Health article by Mike Mejla, MS, CSCS. It provides some bench marks on when to add weight to body weight for increasing reps, for instance, that i'm finding very helpful.
Another approach that many RKC's have claimed super success: once you can do 7-10 reps, start adding weight, and start again. They have found that working with weights has let them, when going "naked" get rep ranges for which they have not trained.
These 4 approaches rather assume you can already do one pull up, but what if you can't? A number of both my male and female students haven't been able to get off the ground right off the bat, and that has kept them from thinking it's possible.
Getting to that First Pull Up
There are many tried and true strategies to get to that first pullup. One includes doing negatives. This is how i got my first pull up. With a negative, you find a way to get to the pullED up position, and then use muscle while going down. We are much stronger going eccentrically (using muscles streching out ) than concentrically (contracting). Negatives are a time proven way to help build up pull ups.
Another strategy is to use an appliance to help get up and down. A great appliance is stretch band. I personally like using Iron Woody bands: they're affordable and durable.
Here's an example vid of how to sling bands to a pull up bar:
Alternative Attachment of the band to the bar: as shown in the vids, some people just loop the band through itself around the bar - that uses up a lot of band and means generally you're using your knee in the band. You can change the resistance of the band by lengthening it. One way to do it is to use a big carabiner to attach the band to the bar. You can also set up some climbing webbing/tubing to the 'biner to get even more length and eliminate the biner. I like the biner when taking the band to the gym: means i can set it up and pack it up quickly.
 One other strategy to get going, and a great use for a smith machine, are Floor Assisted Pull Ups. This approach also mean you're not using your complete body weight, but can increase the resistance (move your legs back or the bar up) as effort improves. Floor assisted work can also of course be combined with negatives.
Once a First Pull Up is achieved, Carter Schoffer also has an interesting pull up program mixing what might be called "raw" and assisted pull up work, where a multiple of the raw pull up is used to calculate numbers of assisted pull ups for sets.
Inspiration. If you would like some inspiration going for that first pull up, you may find it in these folks, men and women alike, who have done the Tactical Strength Challenge. My personal hero is Angela Craig, RKC, of the UK who has come in first internationally for the past two meets [1], [2], well ahead of many gals her junior.
And one more thing. Well three more: Head Position, Flexion/Extension and Bone Rhythm
How many of us crane our necks back to try to get our chins over the bar? Well it turns out, that's not a good ideal: cranking the head back puts a kink in the cervical spine. This spine compression has a negative impact on muscle activation, which can be powerfully demonstrated (as it was at a recent Z health cert) with a muscle activation test. More of an explanation of this "arthrokinetic reflex" can be found in this discussion of head position for the front squat.
Here's a really nice piece by Mike T. Nelson on form and the effect of head position on facilitating this move.
So no neck kinking on the way up. Indeed a drill we were given at z is to practice keeping our spines "tall" head in neutral while pulling up, and just pulling straight up under the bar, till the bar taps the top of the head (as shown in the above vid). No it's not a full pull up, but it gets ya to get optimal alignment for optimal muscle work. Form really is everything.
If you want to help your pull up further, you can, just with your eyes, look UP when pulling up, to focus on the lat extension of the pull up (eyes up connect with extension, also discussed here).
Suck it Up
One powerful technique within the pull up is to suck in the shoulders to enable the lat pull. But another very valuable technique is to suck in the abs - to shorten the distance between the ribs and the hips which Franz Snideman models here about mid way through the vid. Practice this tip and it pays big dividends pretty quickly:
Repping It to Get in the Groove. And if you really want to get in the zone, forget about pulling yourself up, grab one of those big iron woody bands and focus on bone rhythm (see end of this post on the kb front squat for a description). This is more z health stuff: think about the shoulder going up at the same rate the elbow is going down. If you de-weight yourself to practice getting the rhythm, you'll find your pull ups improve. Really. more form focus will pay dividends in short order.
Good luck on your Pull Up Mission. If you have other great pull up plans that have worked for you, please add pointers in the comments section for this post.
And finally
Related posts
For many, the quest to perform a single pull up is a Big Deal. For gals especially, where are upper body strength is at a disadvantage relative to the males of the species, achieving a single body weight pull up is to have reached a critical pinnacle of success. Indeed, in the RKC School of Strength, a key test for men and women as Level 2 instructors is the single Tactical Pull Up: dead hang, pull up so neck touches the bar. Must be completed once, men and women alike.
Methods a Plenty. Fortunately, for something perceived to be such a mark of fitness accomplishment, there are almost as many methods to training to achieve a pull up as there are people blogging about pull ups. Just a reminder, the pull up and chin up are distinguished by the hand grip: the pull up is pronated (palms facing away); the chin up is supinated (palms facing).
The purpose of this post is to go over a few of the many resources where i've heard back from folks i trust to say they actually work.
The Prime Movers of the Pull Up. Before getting into technique, it's worth reviewing what's going on mechanically in the pull up: that can help focus on what we need to be working to make progress (excuse me if this is going over what are basics for you).
Some folks would look at the pull up and say that's arm work: need big biceps to pull yourself up. Indeed, pull ups can be very good for the biceps. The rear delts also come into play. Mainly, however, the pull up works the back. In particular it really works the Lats, or latissimus dorsi one of the largest muscles in the body. Some folks may be skeptical about focusing on the lats rather than the bi's for pull ups. Charles Staley motivates the comparison this way "if you load your bodyweight onto a bar, how many times can you curl it? I’m guessing 0."Why are the lats more vital than the biceps in the Pull Up? Let's take a sec to consider the connections of the muscles. The biceps for sure are elbow flexors. And yes, pulling UP means flexing the elbows.
BUT the lats also enable the trunk to be pulled up via shoulder (or glenohumeral joint) extension. How does that work? The lat is like a big triangle of tough stretchy stuff that is nailed down along the spine from the middle of the back, just under the shoulder blade, right down into the butt at the sacrum. That's a lot of back. So the mid thoracic spine is one point on the triangle; the sacrum is the second, and the third is in the arm, on the "medial side of the intertubercular groove of the humerus"The lat connected in this way supports four movements of the shoulder joint: extension (movement of the humerus straight, posteriorly), bringing it across and in front of the body (adduction); internal rotation (putting your lower arm behind your back); bringing your arm up and around so that you can grab the opposite shoulder to the upraised arm (horizontal abduction).
So the biggie move of the lat in the pull up is to get that arm back down by your side. Remember, it's huge area is pulling from the mid back down to the butt, all focused on that single spot in the arm. That's a lot of reef.
Compare that amount of pulling area from the lats into the shoulder against the biceps into the elbow, and it's really no contest. Staley's visualization hits home: trying to biceps curl bodyweight (biceps focus in the pull up) vs pulling bodyweight (lat focus). Intriguingly, we also get an insight into why chin ups are "easier" than pull ups: with a chin up (supinated) grip, we have a more typical curl going, working flexors as well as biceps.
Thinking through the Movement. We can get in the way of our own pull up progress by focussing too much on the biceps and not enough on firing those massive lats. Below are a few techniques to visualize pulling from the lats. If the goal is to focus on the lats rather than biceps, a well known, powerful technique to focus muscle firing is visualization. Powerlifter Jerry Nicolas talks about doing a pull up imagining that the elbows connected to the sides by cables, so that when you're hanging from the bar, the cables are extended; getting up to the bar, the sides are reeling up the cable, raising your body. Charles Staley uses a similar visualization:
[Rather than the advice by others (eg this article) to squeeze the bar as hard as you can as a cue, since that cue focuses on the biceps rather than the lats] a better cue, which helps to recruit the bigger, more powerful lats, is to think about driving your elbows down to your ribcage. Not only does this cue encourage lat contraction, it’s also less daunting to imagine driving your elbows down, than it is to imagine pulling yourself up.Less muscular and more psychological visualizations are those Tom Venuto suggests: imagine yourself to be as light as a feather, and just floating up. Visualizations like these have a long history of success in sports [1] [2].
Aside: Contrasting Lat Pull Downs with Pull ups. Going deeper into not just what muscles are fired on the gross level, but on the micro level, some people wonder whether doing lat pull downs aren't the same as pull ups, except in reverse. The short answer is "no." Two quicky reasons: (1) hanging in space requires different neuro muscular adaptations (different numbers and patterns of muscle fibers recruited within the same muscle) than sitting on a bench and (2) based on Stuart McGill's research (see Ultimate Back Fitness and Performance) on how evil and unnatural sitting is for your back especially, do you *ever* want to do seated resistance work - of any kind?
Enough! Just tell me how to get up! So now that the muscle work is sussed, and the visualizations are worked out, how to get the physical work happening.
IF you can do One or More Pull Ups
Gold Standard: Clarence Bass describes Pavel Tsatsouline's Buddy Ladders. These are expanded in more detail as the Fighter Pull Up sequence (pdf only), also by PT. Each of these sequences is based on a ladder going up: do 1, pause. do 1, 2. pause. do 1,2,3 etc. This simple approach has been shown time and time again to have powerful effects.
Now, i have to say that i have plateaued with ladders at 7, so went looking for alternative approaches. Roland Fisher, a trainer in Alberta i really respect, pointed out a cool program in, yes, a Men's Health article by Mike Mejla, MS, CSCS. It provides some bench marks on when to add weight to body weight for increasing reps, for instance, that i'm finding very helpful.
Another approach that many RKC's have claimed super success: once you can do 7-10 reps, start adding weight, and start again. They have found that working with weights has let them, when going "naked" get rep ranges for which they have not trained.
These 4 approaches rather assume you can already do one pull up, but what if you can't? A number of both my male and female students haven't been able to get off the ground right off the bat, and that has kept them from thinking it's possible.
Getting to that First Pull Up
There are many tried and true strategies to get to that first pullup. One includes doing negatives. This is how i got my first pull up. With a negative, you find a way to get to the pullED up position, and then use muscle while going down. We are much stronger going eccentrically (using muscles streching out ) than concentrically (contracting). Negatives are a time proven way to help build up pull ups.
Another strategy is to use an appliance to help get up and down. A great appliance is stretch band. I personally like using Iron Woody bands: they're affordable and durable.
Here's an example vid of how to sling bands to a pull up bar:
Alternative Attachment of the band to the bar: as shown in the vids, some people just loop the band through itself around the bar - that uses up a lot of band and means generally you're using your knee in the band. You can change the resistance of the band by lengthening it. One way to do it is to use a big carabiner to attach the band to the bar. You can also set up some climbing webbing/tubing to the 'biner to get even more length and eliminate the biner. I like the biner when taking the band to the gym: means i can set it up and pack it up quickly.
One other strategy to get going, and a great use for a smith machine, are Floor Assisted Pull Ups. This approach also mean you're not using your complete body weight, but can increase the resistance (move your legs back or the bar up) as effort improves. Floor assisted work can also of course be combined with negatives.Once a First Pull Up is achieved, Carter Schoffer also has an interesting pull up program mixing what might be called "raw" and assisted pull up work, where a multiple of the raw pull up is used to calculate numbers of assisted pull ups for sets.
Inspiration. If you would like some inspiration going for that first pull up, you may find it in these folks, men and women alike, who have done the Tactical Strength Challenge. My personal hero is Angela Craig, RKC, of the UK who has come in first internationally for the past two meets [1], [2], well ahead of many gals her junior.
And one more thing. Well three more: Head Position, Flexion/Extension and Bone Rhythm
How many of us crane our necks back to try to get our chins over the bar? Well it turns out, that's not a good ideal: cranking the head back puts a kink in the cervical spine. This spine compression has a negative impact on muscle activation, which can be powerfully demonstrated (as it was at a recent Z health cert) with a muscle activation test. More of an explanation of this "arthrokinetic reflex" can be found in this discussion of head position for the front squat.
Here's a really nice piece by Mike T. Nelson on form and the effect of head position on facilitating this move.
So no neck kinking on the way up. Indeed a drill we were given at z is to practice keeping our spines "tall" head in neutral while pulling up, and just pulling straight up under the bar, till the bar taps the top of the head (as shown in the above vid). No it's not a full pull up, but it gets ya to get optimal alignment for optimal muscle work. Form really is everything.
If you want to help your pull up further, you can, just with your eyes, look UP when pulling up, to focus on the lat extension of the pull up (eyes up connect with extension, also discussed here).
Suck it Up
One powerful technique within the pull up is to suck in the shoulders to enable the lat pull. But another very valuable technique is to suck in the abs - to shorten the distance between the ribs and the hips which Franz Snideman models here about mid way through the vid. Practice this tip and it pays big dividends pretty quickly:
Repping It to Get in the Groove. And if you really want to get in the zone, forget about pulling yourself up, grab one of those big iron woody bands and focus on bone rhythm (see end of this post on the kb front squat for a description). This is more z health stuff: think about the shoulder going up at the same rate the elbow is going down. If you de-weight yourself to practice getting the rhythm, you'll find your pull ups improve. Really. more form focus will pay dividends in short order.
Good luck on your Pull Up Mission. If you have other great pull up plans that have worked for you, please add pointers in the comments section for this post.
And finally
Related posts
- pull up happiness
- the ottoman pistol series - muscles involved.
- the amazing shoulder part 1 - scapula
- the amazing shoulder part II - g/h joint
Tuesday, August 19, 2008
Kettlebell Front Squat Breathing Micro Master Class by Will Williams
Follow @mcphoo
Tweet
I've commented before on RKC Team Lead Will Williams artful kettle bell front squat. At the aug08 CK-FMS, i was able to get a few precious minutes with Will between sessions for him to demo his technique, in particular, the breathing sequence of the KB FS.
[update 1, below]
You'll note the "huh" hiccup at the end of the down stroke, as well as the tsss inhalation at the top of the sequence. Will explains this cycle at the end of the demonstration.
will williams performing kettlebell front squat
(voice over: mc)
You may want to turn the audio up during the exercise sequence so you can hear the breathing intake, hiccup and exhalation.
Will has previously described this breathing as:
Follow up, Sept 11, 08: bone rhythm
Will's technique is awesome on breathing.
This past week i've learned a new one called "bone rhythm" that would suggest for added efficiency, there's one more component to add here: the knees finish moving at the same time as the butt. Here, the knees finish moving sooner than the butt. Mike describes bone rhythmn here. And if you look at Mike perform a deadlift here, you can see BR in motion:
the hips and knees are together on the descent (finish the move down at the same time) and the hips finish with the knees on the pull up - check the speed differences of both parts but note the synching is the same. It's the physics of efficiency. It takes practice in a mirror, or with a partner.
A tip Kathy Mauck gave me while working on this with my deadlift was to close my eyes. Once i did that i could feel the timing a lot more clearly. It's kinda weird and wonderful to get. It sure helped my dead.
Now to try blending this with will's super breathing...
Update Nov. 08 Recently came back to thinking about the front squat when thinking about the perfect rep, looking at it from z health's four aspects of efficient movement, of which breathing is one. Also get into the arthrokinetic reflex and the effect of head position on strength. Tweet Follow @begin2dig
[update 1, below]
You'll note the "huh" hiccup at the end of the down stroke, as well as the tsss inhalation at the top of the sequence. Will explains this cycle at the end of the demonstration.
will williams performing kettlebell front squat
(voice over: mc)
Will has previously described this breathing as:
From the top, get tight and begin to Breathe Behind the Shield [inhaling into yoru nose as you brace the abdomen] and descend into the squat. AS YOU HIT BOTTOM, not before or after, you pressurive and 'SAVE" your inhale with the small, short, barely audible grunt/hiccup, from there, stay tight everywhere, and as you extend the hips and complete the concentric portion of the squat, blow out the candle 10 feet in front of you, reload and repeat.
Follow up, Sept 11, 08: bone rhythm
Will's technique is awesome on breathing.
This past week i've learned a new one called "bone rhythm" that would suggest for added efficiency, there's one more component to add here: the knees finish moving at the same time as the butt. Here, the knees finish moving sooner than the butt. Mike describes bone rhythmn here. And if you look at Mike perform a deadlift here, you can see BR in motion:
the hips and knees are together on the descent (finish the move down at the same time) and the hips finish with the knees on the pull up - check the speed differences of both parts but note the synching is the same. It's the physics of efficiency. It takes practice in a mirror, or with a partner.
A tip Kathy Mauck gave me while working on this with my deadlift was to close my eyes. Once i did that i could feel the timing a lot more clearly. It's kinda weird and wonderful to get. It sure helped my dead.
Now to try blending this with will's super breathing...
Update Nov. 08 Recently came back to thinking about the front squat when thinking about the perfect rep, looking at it from z health's four aspects of efficient movement, of which breathing is one. Also get into the arthrokinetic reflex and the effect of head position on strength. Tweet Follow @begin2dig
Friday, August 15, 2008
The Refined Turkish Getup: Functional as well as Diagnostic
Follow @mcphoo
Tweet
What is a Turkish Get Up, and why is it such a stable element of Hard Style Kettlebell Training? Is there a "hardstyle" or "RKC" form of the Turkish Get Up, and why should you care - or care to practice this form rather than any other? These questions and more are explored in the following post.
(April 09: update on Position 4, the High Hip Bridge debate here)
(april 09, two: update on TGU as Diagnostic compared with FMS more questions than answers)
and just to be explicit, the following has now been captured in incredible step by step detail, with corrective drills, in the Kalos Sthenos DVD/Manual, touched on in the above two links.
 There have been a number of posts of late on the various RKC sites commenting on how the Turkish Get Up has evolved as a move at the RKC.
For folks not familiar with it, the Turkish Get Up is a great full body move that asks a person to go from a supine position to a standing position and back down again with a weight held in a fully extended arm. To achieve this work, just about everything is involved at some point in the move. It's been adopted into a suite of core kettlebell moves. This is why most recently Gray Cook and Brett Jones have been talking about it as a great diagnostic move too for calisthenics or beautiful movement.
There are numerous variations of this form with kettlebells, but over the past year or so, it has settled into a crisp clear execution of form designed to work the full body very well. While there is some debate about who/when this form was evolved, it's the one Hard Style is promoting, and for good reason. The illustrations following are of Dr. Mark Cheng, the person who wrote the latest RKC certification manual section on the Turkish Get Up.
As Brett Jones has said, this version of the TGU is not meant to replace any other TGU version, but it is an excellent diagnostic for showing where weaknesses may be. Combine this with the Functional Movement Screen, and we can see where there are stability or mobility issues and how to address them. If the TGU improves, the methods were effective; if it gets worse, need to check again what's up.
As a general technique, it is also strongly recommended that TGU's are practiced naked to start with (ie nothing in your hands), then work up to balancing a shoe on the flat of the palm to ensure excellent arm positioning and body awareness,THEN think about weight. At the recent Certified Kettlebell Functional Movement Specialist workshop (review here), Brett Jones ended up calling the Naked TGU + Shoe the Extreme TGU. In our group where we decided to go naked + shoe (before it was called "extreme"), Tom Nunn and i personally found that using the shoe gave us a focus for our raised arm without unduly fatiguing us with weight while we were frequently pausing and repeating moves to interrogate what might be happening with form.
Indeed, for those new to this move, get the form perfect first is the message: there's a LOT of neuro-muscular adaptation in this move that will work you out without anything in your hand, fear not.
Here's a review of the complete TGU as illustrated by RKC Team Lead Dr. Mark Cheng at the CK-FMS workshop
(1) start rolled full length on the side to grasp the bell with both hands


 (8) With your left foot leg on the ground, bring your right leg back through - work to get this pull through as even as possible - so that you get your knee down behind you and your hip lined up with that hand on the ground. Left knee still up.
update/note April 09: there's been some debate about whether or not or why or why not this hip thrust is the right thing to do in a TGU. There's a discussion/analysis of at least some of that debate in an accompanying post on the high hip bridge, here.
 * Added Note: Windmill hinge vs Windshield Wiper Crouch.
At the CK-FMS, this position caused considerable discussion. You'll note Doc is almost in a crouch here and the right leg is doing what came to be called a "wind shield wiper move" with the right foot almost aligning behind the left foot.
Here are comments from Andrea Chang, RKC, based on discussions of this posture with Pavel, Andrea du Cane, Gray Cook and Mark Cheng (quoted with permission):
Back to the sequence: So now you're kneeling on one knee, with one hand on the ground, arm straight and the other arm up with the KB. Note alignment of hand by side
(9) Get your hand off the ground so you're now in a genuflecting position. You are not using the hand on the ground to give you a boost up: this is a controlled movement of the torso into an upright position. If you cannot get to that upright position smoothly, that's another sign of work to do.
 (10) put your weight on that forward leg (the left leg with the foot firmly planted on the ground), you can look straight ahead now, and stand up. No hesitancy, just right up. The shoulder with the bell should be sucked down into the socket, the lats fired holding up that kettlebell. If it's difficult to get to that standing position in one step, work to do there, too.
 * Now reverse.
back into kneel

 leg back through and hip up
 lower butt, leg extending out, arm on ground extended and hand by hip
 lower to elbow

 bring the bell down to the chest (no photo - sorry)
roll to side with bell

The goal in part is to get this to be a crisp sequence of steps that can be broken down into individual units and then flowed into one motion.
1. kb to chest
2. press up bell
3. arm to side
4. roll to side
5. on elbow
6. on hand
7. hips up
8. leg back to kneel prep
9. torso erect in genuflect
10. Stand up
reverse.
Throughout, stay in a straight line all the way up: so the direction you start the TGU in is the direction you end in.
Putting it all together, here is Mark carrying out the "bottom's up" version of the TGU (can you see the small differences? also note the windshield wiper move going from bridge to genuflect to standing, rather than windmill hinge):
The problems we attended were:
- the extended leg leaving the ground
- The bent knee caving in
- inability to lower to do a controlled lower of hand to ground from genuflect or to get up to
-genuflect from hand on ground
- difficulty with hip extension
Each of these issues maps to a corresponding stability and/or mobility issue that comes out in the FMS (pdf overview here). That's pretty cool. It's interesting to see that sometimes simply cleaning up form (position of hand relative to hip) has an major influence on performance. Or sometimes other work needs to be done. Regardless, we all knew the TGU was a powerful as a move in its own right; now we know it's powerful as a diagnostic tool as well.
As always, if moves like this are new to you, find an RKC in your neighborhood and ask them to check your form: a post is no replacement for a skilled set of eyeballs - especially those training up now with the CK-FMS.
Thanks to Andrea Chang for synthesizing the discussion on Position 4/photos 8 & 12
(April 09: update on Position 4, the High Hip Bridge debate here)
(april 09, two: update on TGU as Diagnostic compared with FMS more questions than answers)
and just to be explicit, the following has now been captured in incredible step by step detail, with corrective drills, in the Kalos Sthenos DVD/Manual, touched on in the above two links.
There have been a number of posts of late on the various RKC sites commenting on how the Turkish Get Up has evolved as a move at the RKC.For folks not familiar with it, the Turkish Get Up is a great full body move that asks a person to go from a supine position to a standing position and back down again with a weight held in a fully extended arm. To achieve this work, just about everything is involved at some point in the move. It's been adopted into a suite of core kettlebell moves. This is why most recently Gray Cook and Brett Jones have been talking about it as a great diagnostic move too for calisthenics or beautiful movement.
There are numerous variations of this form with kettlebells, but over the past year or so, it has settled into a crisp clear execution of form designed to work the full body very well. While there is some debate about who/when this form was evolved, it's the one Hard Style is promoting, and for good reason. The illustrations following are of Dr. Mark Cheng, the person who wrote the latest RKC certification manual section on the Turkish Get Up.
As Brett Jones has said, this version of the TGU is not meant to replace any other TGU version, but it is an excellent diagnostic for showing where weaknesses may be. Combine this with the Functional Movement Screen, and we can see where there are stability or mobility issues and how to address them. If the TGU improves, the methods were effective; if it gets worse, need to check again what's up.
As a general technique, it is also strongly recommended that TGU's are practiced naked to start with (ie nothing in your hands), then work up to balancing a shoe on the flat of the palm to ensure excellent arm positioning and body awareness,THEN think about weight. At the recent Certified Kettlebell Functional Movement Specialist workshop (review here), Brett Jones ended up calling the Naked TGU + Shoe the Extreme TGU. In our group where we decided to go naked + shoe (before it was called "extreme"), Tom Nunn and i personally found that using the shoe gave us a focus for our raised arm without unduly fatiguing us with weight while we were frequently pausing and repeating moves to interrogate what might be happening with form.
Indeed, for those new to this move, get the form perfect first is the message: there's a LOT of neuro-muscular adaptation in this move that will work you out without anything in your hand, fear not.
Here's a review of the complete TGU as illustrated by RKC Team Lead Dr. Mark Cheng at the CK-FMS workshop
(1) start rolled full length on the side to grasp the bell with both hands
(2) then you're rolled flat on back with KB to chest (no photo)
(3) press up the bell with both hands straight up
(4) if the bell is going to be held with the left, bring the right arm down at 30-45 degrees to your body so that your hand is in line with your hip - this hip/hand alignment is critical: notice for now where the knee is: it is upright rather than collapsing in. Keep it there. That hand by the hip will help that in the rest of the moves.
(5) Go up on your right elbow from that position (keep the KB left arm straight). Again, notice the knee: upright, rather than collapsing in. Also, that right leg did not leave the ground while getting up onto the elbow. If it does leave the ground, that's another sign of work to do.
(6) then go up on your right hand - note hand position still close by hip
(7) then PRESS UP YOUR HIPS - you're on your side remember, so you have a line through your nice straight body at this point with the kb straight up, and you balanced on the other hand. Lats are fired on both sides. make sure to feel you lats working. If this hip elevation position is an issue, that's another sign of another issue for work.
update/note April 09: there's been some debate about whether or not or why or why not this hip thrust is the right thing to do in a TGU. There's a discussion/analysis of at least some of that debate in an accompanying post on the high hip bridge, here.
At the CK-FMS, this position caused considerable discussion. You'll note Doc is almost in a crouch here and the right leg is doing what came to be called a "wind shield wiper move" with the right foot almost aligning behind the left foot.
Here are comments from Andrea Chang, RKC, based on discussions of this posture with Pavel, Andrea du Cane, Gray Cook and Mark Cheng (quoted with permission):
looking at the pictures in your blog again, photo 8 [above -mc] shows the transition from the hips up bridge to the kneeling position, where mark sweeps his leg back and places his knee near his hand. in photo #8, his knee is further back than usual and he is crouching, showing more flexion in the knee on the ground. what i heard was that this is due to his particular martial art -- which movement's of helped him to develop this move -- however, the consensus was that the crouch was too pronounced. whether or not you need to do a windshield wiper move with your leg to help get in a more stable position is determined by your own body mechanics, it is not manditory as far as i understand.
the knee should be closer to the hand on the ground, allowing for the body to be in a more open hips forward stance, with an elongated spine, packed shoulders and zipped up core (yup i said core).
using the windmill technique to get out of, or back into, position #4 (photo #8 in mc's blog) is preferable to the crouch, and what eventually agreed upon at the ck-fms. note of caution, the hinge at the hips for the windmill technique can be cheated by novices/students by allowing the hand they place on the ground to go down rather quickly with a thump -- this is not desired. a controlled descent is what they're after.
Back to the sequence: So now you're kneeling on one knee, with one hand on the ground, arm straight and the other arm up with the KB. Note alignment of hand by side
(9) Get your hand off the ground so you're now in a genuflecting position. You are not using the hand on the ground to give you a boost up: this is a controlled movement of the torso into an upright position. If you cannot get to that upright position smoothly, that's another sign of work to do.
back into kneel
hand down by hip - maintaining control, not falling over onto the hand but deliberately lowering hand by hip (for those who know the move, think hinge from Windmill).
lower to back
both hands on bell to bring it down to the chestroll to side with bell
The goal in part is to get this to be a crisp sequence of steps that can be broken down into individual units and then flowed into one motion.
1. kb to chest
2. press up bell
3. arm to side
4. roll to side
5. on elbow
6. on hand
7. hips up
8. leg back to kneel prep
9. torso erect in genuflect
10. Stand up
reverse.
Throughout, stay in a straight line all the way up: so the direction you start the TGU in is the direction you end in.
Putting it all together, here is Mark carrying out the "bottom's up" version of the TGU (can you see the small differences? also note the windshield wiper move going from bridge to genuflect to standing, rather than windmill hinge):
The problems we attended were:
- the extended leg leaving the ground
- The bent knee caving in
- inability to lower to do a controlled lower of hand to ground from genuflect or to get up to
-genuflect from hand on ground
- difficulty with hip extension
Each of these issues maps to a corresponding stability and/or mobility issue that comes out in the FMS (pdf overview here). That's pretty cool. It's interesting to see that sometimes simply cleaning up form (position of hand relative to hip) has an major influence on performance. Or sometimes other work needs to be done. Regardless, we all knew the TGU was a powerful as a move in its own right; now we know it's powerful as a diagnostic tool as well.
As always, if moves like this are new to you, find an RKC in your neighborhood and ask them to check your form: a post is no replacement for a skilled set of eyeballs - especially those training up now with the CK-FMS.
Thanks to Andrea Chang for synthesizing the discussion on Position 4/photos 8 & 12
photos © mc, 2008
Tweet
Follow @begin2dig
Thursday, July 17, 2008
The Anti-Goal and First (things First) Principles
Follow @mcphoo
Tweet
Rannoch the Profound has a post about what happens to folks to scuttle their training:
Rannoch's observation got me wondering if one of the limiting factors that contributes to this OCD training effect is The Goal. This is not to say that goals are bad at all, but they can become mental mine fields when not treated appropriately. The voice in the head becomes:
That's kind of voice sounds irily reminiscent of procrastination/perfectionism. When the goal feels too daunting to achieve well, just leave it to the last minute and blame the fact that you didn't have enough time; or worry worry worry the little details (see "getting intrigued") rather than the big picture. Fear, fear of failure, of therefore being a failure is the thing in either case, and so inertia, it seems, sets in.
 Goals have a lot to answer for. In a sense, perhaps, as Stephen Covey might put it, it's a trust issue with ourselves: if we don't meet our commitment to our goals, we break faith with ourselves till we give up on ourselves. Frequently we may coat the cost of this failure by "getting intrigued" (described towards the end of this post on complexity ). Where we say oh this isn't right; that isn't right; i'll do it tomorrow when the moon and the stars are aligned and i feel better.
For myself, this failure can be a particularly trying place to be if i can look back and see past successes, dedication, effort. So what's wrong with me *now* that that's not happening?
Maybe a better question to ask is what needs to be in place to re-establish relations with ourselves to feel that success of having done it than that dread of another day gone and the Goal further dishonored.
Maybe some of us who have already figured out that working out is important for our health, our spirit, our commitments, have to be to get to the headspace where the Real Goal is first to remember how to keep faith with ourselves and second to find a path back to doing that in terms of our fitness, health, well being. Perhaps it's as simple as re-setting the goal temporarily to something we KNOW we can accomplish, perhaps just to move something today. To move ourselves, a kettlebell, a rock - through space, perhaps multiple times in a row or throughout the day, and that that *is* a good thing, not only because it really *is* better than nothing, but because we said we would and we did.
Progressively, repeatedly, soon, the groove to that larger goal may just return, when we build our own confidence back up that we can keep our commitments to ourselves and we can trust ourselves with larger challenges.
In the interim, while simply keeping the commitment to move something in a day, we can give ourselves the space to figure out what may be acting in our lives right now such that we've been falling off the wagon; over complicating it, and what perhaps NOT to repeat once we get back in the groove such that we wind up back in the pit - if that's a recurring place to be.
A book i find helpful in this space is Stephen Covey's First Things First. The book talks about the importance of understanding why we *do* things, not in terms of some schedule like life as a perpetual to do list, but in order to define and move from principles. Don't prioritize your schedule; schedule your priorities is a phrase from the book. How do we determine our priorities? Based on what principles? what is our compass?
These questions apply here, in working out, too, i think. If we're not doing what we know to be right and good for our well being, and our ability to serve those we love, then something's askew, no?
Asking such questions can be a rather profound process. Covey suggests a number of ways to engage what can be very challenging work, where not working out is a symptom whose more profound causes may need investigation.
But in this meantime of engaging that process, and assuming that part of it may just be this loss of faith with ourselves to follow through on our commitments to ourselves, here's to everyone who's having a moment of doubt and self criticism. Let's give ourselves a break and all promise to do one push up, one swing, one pistol - one something - together in five minutes, and build on that.
Congratulations to us, we did it. Tweet Follow @begin2dig
You are trying get moving, not launch a rocket.
So many people seem to struggle with this. If the conditions aren't optimal they simply abort.
Give me 10 minutes and a kettlebell. Not so hard.
For those with workout OCD, it stops progress in it's tracks. The requirement to have everything in it's proper place prevents them from so much as breaking a sweat. This anabolic anxiety permeates everything they try to do. Plans are great but if you are fixated on a having all the ingredients for particular outcome you are missing "all that heavenly glory".
Rannoch's observation got me wondering if one of the limiting factors that contributes to this OCD training effect is The Goal. This is not to say that goals are bad at all, but they can become mental mine fields when not treated appropriately. The voice in the head becomes:
I *have* to do this kind of workout today because of this GOAL i have for date X, and if i can't train that way because of whatever (including just being pooped) then what's the point? anything "less" than the prescribed load, volume and moves is just failure (to serve teh goal), so why bother? I'm such a loser, aren't i?
That's kind of voice sounds irily reminiscent of procrastination/perfectionism. When the goal feels too daunting to achieve well, just leave it to the last minute and blame the fact that you didn't have enough time; or worry worry worry the little details (see "getting intrigued") rather than the big picture. Fear, fear of failure, of therefore being a failure is the thing in either case, and so inertia, it seems, sets in.
Goals have a lot to answer for. In a sense, perhaps, as Stephen Covey might put it, it's a trust issue with ourselves: if we don't meet our commitment to our goals, we break faith with ourselves till we give up on ourselves. Frequently we may coat the cost of this failure by "getting intrigued" (described towards the end of this post on complexity ). Where we say oh this isn't right; that isn't right; i'll do it tomorrow when the moon and the stars are aligned and i feel better. For myself, this failure can be a particularly trying place to be if i can look back and see past successes, dedication, effort. So what's wrong with me *now* that that's not happening?
Maybe a better question to ask is what needs to be in place to re-establish relations with ourselves to feel that success of having done it than that dread of another day gone and the Goal further dishonored.
Maybe some of us who have already figured out that working out is important for our health, our spirit, our commitments, have to be to get to the headspace where the Real Goal is first to remember how to keep faith with ourselves and second to find a path back to doing that in terms of our fitness, health, well being. Perhaps it's as simple as re-setting the goal temporarily to something we KNOW we can accomplish, perhaps just to move something today. To move ourselves, a kettlebell, a rock - through space, perhaps multiple times in a row or throughout the day, and that that *is* a good thing, not only because it really *is* better than nothing, but because we said we would and we did.
Progressively, repeatedly, soon, the groove to that larger goal may just return, when we build our own confidence back up that we can keep our commitments to ourselves and we can trust ourselves with larger challenges.
In the interim, while simply keeping the commitment to move something in a day, we can give ourselves the space to figure out what may be acting in our lives right now such that we've been falling off the wagon; over complicating it, and what perhaps NOT to repeat once we get back in the groove such that we wind up back in the pit - if that's a recurring place to be.
A book i find helpful in this space is Stephen Covey's First Things First. The book talks about the importance of understanding why we *do* things, not in terms of some schedule like life as a perpetual to do list, but in order to define and move from principles. Don't prioritize your schedule; schedule your priorities is a phrase from the book. How do we determine our priorities? Based on what principles? what is our compass?
These questions apply here, in working out, too, i think. If we're not doing what we know to be right and good for our well being, and our ability to serve those we love, then something's askew, no?
Asking such questions can be a rather profound process. Covey suggests a number of ways to engage what can be very challenging work, where not working out is a symptom whose more profound causes may need investigation.
But in this meantime of engaging that process, and assuming that part of it may just be this loss of faith with ourselves to follow through on our commitments to ourselves, here's to everyone who's having a moment of doubt and self criticism. Let's give ourselves a break and all promise to do one push up, one swing, one pistol - one something - together in five minutes, and build on that.
Congratulations to us, we did it. Tweet Follow @begin2dig
Wednesday, July 16, 2008
Rannoch is Profound
Follow @mcphoo
Tweet
Rannoch Donald is known to some for his Simple Strength kettlebell glyph.
To others he's the RKC from Scotland.

If you haven't read his blog, you own yourself the pleasure of the text. It's so straight, clear and no bullshit, it's like a field in the morning after the rain. a breath of fresh air. It doesn't matter if he's talking about training or dining, it's real (i like real).
If you read only one (well, other) blog today, hope you'll check out Rannoch's. Likely, you'll be back.
And if you like what you read, perhaps you may consider buying a t-shirt. Tweet Follow @begin2dig
To others he's the RKC from Scotland.
If you haven't read his blog, you own yourself the pleasure of the text. It's so straight, clear and no bullshit, it's like a field in the morning after the rain. a breath of fresh air. It doesn't matter if he's talking about training or dining, it's real (i like real).
If you read only one (well, other) blog today, hope you'll check out Rannoch's. Likely, you'll be back.
And if you like what you read, perhaps you may consider buying a t-shirt. Tweet Follow @begin2dig
Saturday, July 5, 2008
More Inspiration: Ross Does Real
Follow @mcphoo
Tweet
Every once in awhile you see something where your jaw just drops. Steve Freides of the Tactical Strength Challenge pointed this article and video out today as a demo of plyometric upper body work by Ross Enamait
If you haven't encountered Enamait before, it's well worth the trip. This video demonstrates what strength can be wrought from basic, clean, hard work. His fame is low tech, hard core training. It just screams "real," don't you think?
Tweet Follow @begin2dig
If you haven't encountered Enamait before, it's well worth the trip. This video demonstrates what strength can be wrought from basic, clean, hard work. His fame is low tech, hard core training. It just screams "real," don't you think?
Tweet Follow @begin2dig
Friday, June 20, 2008
Working Out with the 24: weird magic
Follow @mcphoo
Tweet
It wasn't until the RKC that i had ever attempted picking up a 24k bell, never mind doing any  activity with it - like swinging or cleaning it. Lynda Angeles RKCII encouraged me to give it a go. And much to my surprise, swinging two of them for double kb's was awesome. truly awesome.
Over the weekend, i was able to do a lot of swing sets with the 24. all two handed, but they felt great. So did sets of cleans - really focuses the hip action.
The thing that is a mystery to me is that i have a 20kg at work and give it a go during the day just for some GTG work - and it seems always to floor me. And yet the 24 is like a completely different animal. It's exciting. I can hardly wait to work with it. Have no idea why it has that effect, but there it is.
Amazing, and loving it. Tweet Follow @begin2dig
Subscribe to:
Posts (Atom)
 COACHING with dr. m.c.