Saturday, August 23, 2008
Pull Ups: How To Do Pull Ups Resources (Pull Ups 101)
Follow @mcphoo
Tweet
What muscles do pull ups work? How increase number of pull ups: with weights or reps? How achieve that first pull up? What's Pavel's Fighter Pull Up Program? What's the difference between a chin up and a pull up? These topics and more looked at in this post.
For many, the quest to perform a single pull up is a Big Deal. For gals especially, where are upper body strength is at a disadvantage relative to the males of the species, achieving a single body weight pull up is to have reached a critical pinnacle of success. Indeed, in the RKC School of Strength, a key test for men and women as Level 2 instructors is the single Tactical Pull Up: dead hang, pull up so neck touches the bar. Must be completed once, men and women alike.
Methods a Plenty. Fortunately, for something perceived to be such a mark of fitness accomplishment, there are almost as many methods to training to achieve a pull up as there are people blogging about pull ups. Just a reminder, the pull up and chin up are distinguished by the hand grip: the pull up is pronated (palms facing away); the chin up is supinated (palms facing).
The purpose of this post is to go over a few of the many resources where i've heard back from folks i trust to say they actually work.
The Prime Movers of the Pull Up. Before getting into technique, it's worth reviewing what's going on mechanically in the pull up: that can help focus on what we need to be working to make progress (excuse me if this is going over what are basics for you).
 Some folks would look at the pull up and say that's arm work: need big biceps to pull yourself up. Indeed, pull ups can be very good for the biceps. The rear delts also come into play. Mainly, however, the pull up works the back. In particular it really works the Lats, or latissimus dorsi one of the largest muscles in the body. Some folks may be skeptical about focusing on the lats rather than the bi's for pull ups. Charles Staley motivates the comparison this way "if you load your bodyweight onto a bar, how many times can you curl it? I’m guessing 0."
Why are the lats more vital than the biceps in the Pull Up? Let's take a sec to consider the connections of the muscles. The biceps for sure are elbow flexors. And yes, pulling UP means flexing the elbows.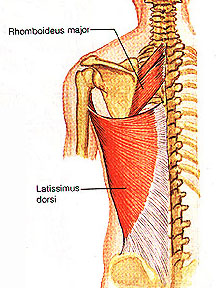 BUT the lats also enable the trunk to be pulled up via shoulder (or glenohumeral joint) extension. How does that work? The lat is like a big triangle of tough stretchy stuff that is nailed down along the spine from the middle of the back, just under the shoulder blade, right down into the butt at the sacrum. That's a lot of back. So the mid thoracic spine is one point on the triangle; the sacrum is the second, and the third is in the arm, on the "medial side of the intertubercular groove of the humerus"
The lat connected in this way supports four movements of the shoulder joint: extension (movement of the humerus straight, posteriorly), bringing it across and in front of the body (adduction); internal rotation (putting your lower arm behind your back); bringing your arm up and around so that you can grab the opposite shoulder to the upraised arm (horizontal abduction).
So the biggie move of the lat in the pull up is to get that arm back down by your side. Remember, it's huge area is pulling from the mid back down to the butt, all focused on that single spot in the arm. That's a lot of reef.
Compare that amount of pulling area from the lats into the shoulder against the biceps into the elbow, and it's really no contest. Staley's visualization hits home: trying to biceps curl bodyweight (biceps focus in the pull up) vs pulling bodyweight (lat focus). Intriguingly, we also get an insight into why chin ups are "easier" than pull ups: with a chin up (supinated) grip, we have a more typical curl going, working flexors as well as biceps.
Thinking through the Movement. We can get in the way of our own pull up progress by focussing too much on the biceps and not enough on firing those massive lats. Below are a few techniques to visualize pulling from the lats. If the goal is to focus on the lats rather than biceps, a well known, powerful technique to focus muscle firing is visualization. Powerlifter Jerry Nicolas talks about doing a pull up imagining that the elbows connected to the sides by cables, so that when you're hanging from the bar, the cables are extended; getting up to the bar, the sides are reeling up the cable, raising your body. Charles Staley uses a similar visualization:
Aside: Contrasting Lat Pull Downs with Pull ups. Going deeper into not just what muscles are fired on the gross level, but on the micro level, some people wonder whether doing lat pull downs aren't the same as pull ups, except in reverse. The short answer is "no." Two quicky reasons: (1) hanging in space requires different neuro muscular adaptations (different numbers and patterns of muscle fibers recruited within the same muscle) than sitting on a bench and (2) based on Stuart McGill's research (see Ultimate Back Fitness and Performance) on how evil and unnatural sitting is for your back especially, do you *ever* want to do seated resistance work - of any kind?
Enough! Just tell me how to get up! So now that the muscle work is sussed, and the visualizations are worked out, how to get the physical work happening.
IF you can do One or More Pull Ups
Gold Standard: Clarence Bass describes Pavel Tsatsouline's Buddy Ladders. These are expanded in more detail as the Fighter Pull Up sequence (pdf only), also by PT. Each of these sequences is based on a ladder going up: do 1, pause. do 1, 2. pause. do 1,2,3 etc. This simple approach has been shown time and time again to have powerful effects.
Now, i have to say that i have plateaued with ladders at 7, so went looking for alternative approaches. Roland Fisher, a trainer in Alberta i really respect, pointed out a cool program in, yes, a Men's Health article by Mike Mejla, MS, CSCS. It provides some bench marks on when to add weight to body weight for increasing reps, for instance, that i'm finding very helpful.
Another approach that many RKC's have claimed super success: once you can do 7-10 reps, start adding weight, and start again. They have found that working with weights has let them, when going "naked" get rep ranges for which they have not trained.
These 4 approaches rather assume you can already do one pull up, but what if you can't? A number of both my male and female students haven't been able to get off the ground right off the bat, and that has kept them from thinking it's possible.
Getting to that First Pull Up
There are many tried and true strategies to get to that first pullup. One includes doing negatives. This is how i got my first pull up. With a negative, you find a way to get to the pullED up position, and then use muscle while going down. We are much stronger going eccentrically (using muscles streching out ) than concentrically (contracting). Negatives are a time proven way to help build up pull ups.
Another strategy is to use an appliance to help get up and down. A great appliance is stretch band. I personally like using Iron Woody bands: they're affordable and durable.
Here's an example vid of how to sling bands to a pull up bar:
Alternative Attachment of the band to the bar: as shown in the vids, some people just loop the band through itself around the bar - that uses up a lot of band and means generally you're using your knee in the band. You can change the resistance of the band by lengthening it. One way to do it is to use a big carabiner to attach the band to the bar. You can also set up some climbing webbing/tubing to the 'biner to get even more length and eliminate the biner. I like the biner when taking the band to the gym: means i can set it up and pack it up quickly.
 One other strategy to get going, and a great use for a smith machine, are Floor Assisted Pull Ups. This approach also mean you're not using your complete body weight, but can increase the resistance (move your legs back or the bar up) as effort improves. Floor assisted work can also of course be combined with negatives.
Once a First Pull Up is achieved, Carter Schoffer also has an interesting pull up program mixing what might be called "raw" and assisted pull up work, where a multiple of the raw pull up is used to calculate numbers of assisted pull ups for sets.
Inspiration. If you would like some inspiration going for that first pull up, you may find it in these folks, men and women alike, who have done the Tactical Strength Challenge. My personal hero is Angela Craig, RKC, of the UK who has come in first internationally for the past two meets [1], [2], well ahead of many gals her junior.
And one more thing. Well three more: Head Position, Flexion/Extension and Bone Rhythm
How many of us crane our necks back to try to get our chins over the bar? Well it turns out, that's not a good ideal: cranking the head back puts a kink in the cervical spine. This spine compression has a negative impact on muscle activation, which can be powerfully demonstrated (as it was at a recent Z health cert) with a muscle activation test. More of an explanation of this "arthrokinetic reflex" can be found in this discussion of head position for the front squat.
Here's a really nice piece by Mike T. Nelson on form and the effect of head position on facilitating this move.
So no neck kinking on the way up. Indeed a drill we were given at z is to practice keeping our spines "tall" head in neutral while pulling up, and just pulling straight up under the bar, till the bar taps the top of the head (as shown in the above vid). No it's not a full pull up, but it gets ya to get optimal alignment for optimal muscle work. Form really is everything.
If you want to help your pull up further, you can, just with your eyes, look UP when pulling up, to focus on the lat extension of the pull up (eyes up connect with extension, also discussed here).
Suck it Up
One powerful technique within the pull up is to suck in the shoulders to enable the lat pull. But another very valuable technique is to suck in the abs - to shorten the distance between the ribs and the hips which Franz Snideman models here about mid way through the vid. Practice this tip and it pays big dividends pretty quickly:
Repping It to Get in the Groove. And if you really want to get in the zone, forget about pulling yourself up, grab one of those big iron woody bands and focus on bone rhythm (see end of this post on the kb front squat for a description). This is more z health stuff: think about the shoulder going up at the same rate the elbow is going down. If you de-weight yourself to practice getting the rhythm, you'll find your pull ups improve. Really. more form focus will pay dividends in short order.
Good luck on your Pull Up Mission. If you have other great pull up plans that have worked for you, please add pointers in the comments section for this post.
And finally
Related posts
For many, the quest to perform a single pull up is a Big Deal. For gals especially, where are upper body strength is at a disadvantage relative to the males of the species, achieving a single body weight pull up is to have reached a critical pinnacle of success. Indeed, in the RKC School of Strength, a key test for men and women as Level 2 instructors is the single Tactical Pull Up: dead hang, pull up so neck touches the bar. Must be completed once, men and women alike.
Methods a Plenty. Fortunately, for something perceived to be such a mark of fitness accomplishment, there are almost as many methods to training to achieve a pull up as there are people blogging about pull ups. Just a reminder, the pull up and chin up are distinguished by the hand grip: the pull up is pronated (palms facing away); the chin up is supinated (palms facing).
The purpose of this post is to go over a few of the many resources where i've heard back from folks i trust to say they actually work.
The Prime Movers of the Pull Up. Before getting into technique, it's worth reviewing what's going on mechanically in the pull up: that can help focus on what we need to be working to make progress (excuse me if this is going over what are basics for you).
Some folks would look at the pull up and say that's arm work: need big biceps to pull yourself up. Indeed, pull ups can be very good for the biceps. The rear delts also come into play. Mainly, however, the pull up works the back. In particular it really works the Lats, or latissimus dorsi one of the largest muscles in the body. Some folks may be skeptical about focusing on the lats rather than the bi's for pull ups. Charles Staley motivates the comparison this way "if you load your bodyweight onto a bar, how many times can you curl it? I’m guessing 0."Why are the lats more vital than the biceps in the Pull Up? Let's take a sec to consider the connections of the muscles. The biceps for sure are elbow flexors. And yes, pulling UP means flexing the elbows.
BUT the lats also enable the trunk to be pulled up via shoulder (or glenohumeral joint) extension. How does that work? The lat is like a big triangle of tough stretchy stuff that is nailed down along the spine from the middle of the back, just under the shoulder blade, right down into the butt at the sacrum. That's a lot of back. So the mid thoracic spine is one point on the triangle; the sacrum is the second, and the third is in the arm, on the "medial side of the intertubercular groove of the humerus"The lat connected in this way supports four movements of the shoulder joint: extension (movement of the humerus straight, posteriorly), bringing it across and in front of the body (adduction); internal rotation (putting your lower arm behind your back); bringing your arm up and around so that you can grab the opposite shoulder to the upraised arm (horizontal abduction).
So the biggie move of the lat in the pull up is to get that arm back down by your side. Remember, it's huge area is pulling from the mid back down to the butt, all focused on that single spot in the arm. That's a lot of reef.
Compare that amount of pulling area from the lats into the shoulder against the biceps into the elbow, and it's really no contest. Staley's visualization hits home: trying to biceps curl bodyweight (biceps focus in the pull up) vs pulling bodyweight (lat focus). Intriguingly, we also get an insight into why chin ups are "easier" than pull ups: with a chin up (supinated) grip, we have a more typical curl going, working flexors as well as biceps.
Thinking through the Movement. We can get in the way of our own pull up progress by focussing too much on the biceps and not enough on firing those massive lats. Below are a few techniques to visualize pulling from the lats. If the goal is to focus on the lats rather than biceps, a well known, powerful technique to focus muscle firing is visualization. Powerlifter Jerry Nicolas talks about doing a pull up imagining that the elbows connected to the sides by cables, so that when you're hanging from the bar, the cables are extended; getting up to the bar, the sides are reeling up the cable, raising your body. Charles Staley uses a similar visualization:
[Rather than the advice by others (eg this article) to squeeze the bar as hard as you can as a cue, since that cue focuses on the biceps rather than the lats] a better cue, which helps to recruit the bigger, more powerful lats, is to think about driving your elbows down to your ribcage. Not only does this cue encourage lat contraction, it’s also less daunting to imagine driving your elbows down, than it is to imagine pulling yourself up.Less muscular and more psychological visualizations are those Tom Venuto suggests: imagine yourself to be as light as a feather, and just floating up. Visualizations like these have a long history of success in sports [1] [2].
Aside: Contrasting Lat Pull Downs with Pull ups. Going deeper into not just what muscles are fired on the gross level, but on the micro level, some people wonder whether doing lat pull downs aren't the same as pull ups, except in reverse. The short answer is "no." Two quicky reasons: (1) hanging in space requires different neuro muscular adaptations (different numbers and patterns of muscle fibers recruited within the same muscle) than sitting on a bench and (2) based on Stuart McGill's research (see Ultimate Back Fitness and Performance) on how evil and unnatural sitting is for your back especially, do you *ever* want to do seated resistance work - of any kind?
Enough! Just tell me how to get up! So now that the muscle work is sussed, and the visualizations are worked out, how to get the physical work happening.
IF you can do One or More Pull Ups
Gold Standard: Clarence Bass describes Pavel Tsatsouline's Buddy Ladders. These are expanded in more detail as the Fighter Pull Up sequence (pdf only), also by PT. Each of these sequences is based on a ladder going up: do 1, pause. do 1, 2. pause. do 1,2,3 etc. This simple approach has been shown time and time again to have powerful effects.
Now, i have to say that i have plateaued with ladders at 7, so went looking for alternative approaches. Roland Fisher, a trainer in Alberta i really respect, pointed out a cool program in, yes, a Men's Health article by Mike Mejla, MS, CSCS. It provides some bench marks on when to add weight to body weight for increasing reps, for instance, that i'm finding very helpful.
Another approach that many RKC's have claimed super success: once you can do 7-10 reps, start adding weight, and start again. They have found that working with weights has let them, when going "naked" get rep ranges for which they have not trained.
These 4 approaches rather assume you can already do one pull up, but what if you can't? A number of both my male and female students haven't been able to get off the ground right off the bat, and that has kept them from thinking it's possible.
Getting to that First Pull Up
There are many tried and true strategies to get to that first pullup. One includes doing negatives. This is how i got my first pull up. With a negative, you find a way to get to the pullED up position, and then use muscle while going down. We are much stronger going eccentrically (using muscles streching out ) than concentrically (contracting). Negatives are a time proven way to help build up pull ups.
Another strategy is to use an appliance to help get up and down. A great appliance is stretch band. I personally like using Iron Woody bands: they're affordable and durable.
Here's an example vid of how to sling bands to a pull up bar:
Alternative Attachment of the band to the bar: as shown in the vids, some people just loop the band through itself around the bar - that uses up a lot of band and means generally you're using your knee in the band. You can change the resistance of the band by lengthening it. One way to do it is to use a big carabiner to attach the band to the bar. You can also set up some climbing webbing/tubing to the 'biner to get even more length and eliminate the biner. I like the biner when taking the band to the gym: means i can set it up and pack it up quickly.
One other strategy to get going, and a great use for a smith machine, are Floor Assisted Pull Ups. This approach also mean you're not using your complete body weight, but can increase the resistance (move your legs back or the bar up) as effort improves. Floor assisted work can also of course be combined with negatives.Once a First Pull Up is achieved, Carter Schoffer also has an interesting pull up program mixing what might be called "raw" and assisted pull up work, where a multiple of the raw pull up is used to calculate numbers of assisted pull ups for sets.
Inspiration. If you would like some inspiration going for that first pull up, you may find it in these folks, men and women alike, who have done the Tactical Strength Challenge. My personal hero is Angela Craig, RKC, of the UK who has come in first internationally for the past two meets [1], [2], well ahead of many gals her junior.
And one more thing. Well three more: Head Position, Flexion/Extension and Bone Rhythm
How many of us crane our necks back to try to get our chins over the bar? Well it turns out, that's not a good ideal: cranking the head back puts a kink in the cervical spine. This spine compression has a negative impact on muscle activation, which can be powerfully demonstrated (as it was at a recent Z health cert) with a muscle activation test. More of an explanation of this "arthrokinetic reflex" can be found in this discussion of head position for the front squat.
Here's a really nice piece by Mike T. Nelson on form and the effect of head position on facilitating this move.
So no neck kinking on the way up. Indeed a drill we were given at z is to practice keeping our spines "tall" head in neutral while pulling up, and just pulling straight up under the bar, till the bar taps the top of the head (as shown in the above vid). No it's not a full pull up, but it gets ya to get optimal alignment for optimal muscle work. Form really is everything.
If you want to help your pull up further, you can, just with your eyes, look UP when pulling up, to focus on the lat extension of the pull up (eyes up connect with extension, also discussed here).
Suck it Up
One powerful technique within the pull up is to suck in the shoulders to enable the lat pull. But another very valuable technique is to suck in the abs - to shorten the distance between the ribs and the hips which Franz Snideman models here about mid way through the vid. Practice this tip and it pays big dividends pretty quickly:
Repping It to Get in the Groove. And if you really want to get in the zone, forget about pulling yourself up, grab one of those big iron woody bands and focus on bone rhythm (see end of this post on the kb front squat for a description). This is more z health stuff: think about the shoulder going up at the same rate the elbow is going down. If you de-weight yourself to practice getting the rhythm, you'll find your pull ups improve. Really. more form focus will pay dividends in short order.
Good luck on your Pull Up Mission. If you have other great pull up plans that have worked for you, please add pointers in the comments section for this post.
And finally
Related posts
- pull up happiness
- the ottoman pistol series - muscles involved.
- the amazing shoulder part 1 - scapula
- the amazing shoulder part II - g/h joint
Wednesday, August 20, 2008
Summer in Revew: Diet Science, Turkish Get Up, CK-FMS, Complexity and 'Tude - oh and kilts, too
Follow @mcphoo
Tweet
This summer has seen a lot of interesting activity in terms of approaches to training. The CK-FMS (reviewed here) introduced a bunch of us to the concept of looking at patterns of movement to help us understand how best to tune other moves. As a part of this, it seems we've all gained new appreciation for moves like the Refined Turkish Get Up. Discussion about optimally effective form is ongoing still. RKC's like Dave Whitly have talked about how they're pairing back their TGU work just to focus on this precision.
Within this quest for perfect form (and have you seen Will Williams do a kettlebell front squat?) have been discussions around how to achieve that perfection relative to simplicity at one phase and complexity in another - what is the tension between simplicity and complexity?
In other notes, i spent time to review the science claims of the warrior diet, a way of eating popular among many in the hard style RKC community.
One of the things i've learned is that adherents don't care if the science part of the diet's presentation is questionable, if it works for them, mate! If nothing else, my interest in how/why intermittent vs frequent feeding approaches work for some. As research discussed this summer shows, more than anything, it's staying connected with your support group when dieting.
Other nutrition questions that have been explored are around the Elevation of Fat as the new Black of nutrition and the conflation of carbohydrates as the new dietary evil. Caffeine is also in the precarious position of being both praised and burried. And then, if we're talking about nutrient extremes, there's Lyle McDonald's insightful anodyne reference on Ketogenic Diets. Or maybe you'd just like some miso soup?
In matters of style, there's Kilts & Kettlebells. Whether 21st Century hand made in Edinburgh or Utilikilts - or some other kind entire, there's no denying that kilted kettlebell'ing is grand (never mind the nuances of swinging while swinging). And as to form and function, well flat footwear has also been explored - when bare footing that deadlift ain't possible.
And speaking of deadlift, a few athletes have been inspiring in the DL (like Ruth Kasirye) and elsewhere like Ross Enamait (or did i ask, have you seen W2's front kb squat?)
Great as well to have been able to say hello to Rannoch (who is profound), Mike (who's so knowledgeable) and Rif (who's becoming a zen monk) in person after reading their stuff with mein bitte for so long. It's also been great getting to chat with Rich and Franklin and Rip. Thanks for dropping by gents; please continue to visit and share your thoughts. Tweet Follow @begin2dig
Tuesday, August 19, 2008
Kettlebell Front Squat Breathing Micro Master Class by Will Williams
Follow @mcphoo
Tweet
I've commented before on RKC Team Lead Will Williams artful kettle bell front squat. At the aug08 CK-FMS, i was able to get a few precious minutes with Will between sessions for him to demo his technique, in particular, the breathing sequence of the KB FS.
[update 1, below]
You'll note the "huh" hiccup at the end of the down stroke, as well as the tsss inhalation at the top of the sequence. Will explains this cycle at the end of the demonstration.
will williams performing kettlebell front squat
(voice over: mc)
You may want to turn the audio up during the exercise sequence so you can hear the breathing intake, hiccup and exhalation.
Will has previously described this breathing as:
Follow up, Sept 11, 08: bone rhythm
Will's technique is awesome on breathing.
This past week i've learned a new one called "bone rhythm" that would suggest for added efficiency, there's one more component to add here: the knees finish moving at the same time as the butt. Here, the knees finish moving sooner than the butt. Mike describes bone rhythmn here. And if you look at Mike perform a deadlift here, you can see BR in motion:
the hips and knees are together on the descent (finish the move down at the same time) and the hips finish with the knees on the pull up - check the speed differences of both parts but note the synching is the same. It's the physics of efficiency. It takes practice in a mirror, or with a partner.
A tip Kathy Mauck gave me while working on this with my deadlift was to close my eyes. Once i did that i could feel the timing a lot more clearly. It's kinda weird and wonderful to get. It sure helped my dead.
Now to try blending this with will's super breathing...
Update Nov. 08 Recently came back to thinking about the front squat when thinking about the perfect rep, looking at it from z health's four aspects of efficient movement, of which breathing is one. Also get into the arthrokinetic reflex and the effect of head position on strength. Tweet Follow @begin2dig
[update 1, below]
You'll note the "huh" hiccup at the end of the down stroke, as well as the tsss inhalation at the top of the sequence. Will explains this cycle at the end of the demonstration.
will williams performing kettlebell front squat
(voice over: mc)
Will has previously described this breathing as:
From the top, get tight and begin to Breathe Behind the Shield [inhaling into yoru nose as you brace the abdomen] and descend into the squat. AS YOU HIT BOTTOM, not before or after, you pressurive and 'SAVE" your inhale with the small, short, barely audible grunt/hiccup, from there, stay tight everywhere, and as you extend the hips and complete the concentric portion of the squat, blow out the candle 10 feet in front of you, reload and repeat.
Follow up, Sept 11, 08: bone rhythm
Will's technique is awesome on breathing.
This past week i've learned a new one called "bone rhythm" that would suggest for added efficiency, there's one more component to add here: the knees finish moving at the same time as the butt. Here, the knees finish moving sooner than the butt. Mike describes bone rhythmn here. And if you look at Mike perform a deadlift here, you can see BR in motion:
the hips and knees are together on the descent (finish the move down at the same time) and the hips finish with the knees on the pull up - check the speed differences of both parts but note the synching is the same. It's the physics of efficiency. It takes practice in a mirror, or with a partner.
A tip Kathy Mauck gave me while working on this with my deadlift was to close my eyes. Once i did that i could feel the timing a lot more clearly. It's kinda weird and wonderful to get. It sure helped my dead.
Now to try blending this with will's super breathing...
Update Nov. 08 Recently came back to thinking about the front squat when thinking about the perfect rep, looking at it from z health's four aspects of efficient movement, of which breathing is one. Also get into the arthrokinetic reflex and the effect of head position on strength. Tweet Follow @begin2dig
Friday, August 15, 2008
The Refined Turkish Getup: Functional as well as Diagnostic
Follow @mcphoo
Tweet
What is a Turkish Get Up, and why is it such a stable element of Hard Style Kettlebell Training? Is there a "hardstyle" or "RKC" form of the Turkish Get Up, and why should you care - or care to practice this form rather than any other? These questions and more are explored in the following post.
(April 09: update on Position 4, the High Hip Bridge debate here)
(april 09, two: update on TGU as Diagnostic compared with FMS more questions than answers)
and just to be explicit, the following has now been captured in incredible step by step detail, with corrective drills, in the Kalos Sthenos DVD/Manual, touched on in the above two links.
 There have been a number of posts of late on the various RKC sites commenting on how the Turkish Get Up has evolved as a move at the RKC.
For folks not familiar with it, the Turkish Get Up is a great full body move that asks a person to go from a supine position to a standing position and back down again with a weight held in a fully extended arm. To achieve this work, just about everything is involved at some point in the move. It's been adopted into a suite of core kettlebell moves. This is why most recently Gray Cook and Brett Jones have been talking about it as a great diagnostic move too for calisthenics or beautiful movement.
There are numerous variations of this form with kettlebells, but over the past year or so, it has settled into a crisp clear execution of form designed to work the full body very well. While there is some debate about who/when this form was evolved, it's the one Hard Style is promoting, and for good reason. The illustrations following are of Dr. Mark Cheng, the person who wrote the latest RKC certification manual section on the Turkish Get Up.
As Brett Jones has said, this version of the TGU is not meant to replace any other TGU version, but it is an excellent diagnostic for showing where weaknesses may be. Combine this with the Functional Movement Screen, and we can see where there are stability or mobility issues and how to address them. If the TGU improves, the methods were effective; if it gets worse, need to check again what's up.
As a general technique, it is also strongly recommended that TGU's are practiced naked to start with (ie nothing in your hands), then work up to balancing a shoe on the flat of the palm to ensure excellent arm positioning and body awareness,THEN think about weight. At the recent Certified Kettlebell Functional Movement Specialist workshop (review here), Brett Jones ended up calling the Naked TGU + Shoe the Extreme TGU. In our group where we decided to go naked + shoe (before it was called "extreme"), Tom Nunn and i personally found that using the shoe gave us a focus for our raised arm without unduly fatiguing us with weight while we were frequently pausing and repeating moves to interrogate what might be happening with form.
Indeed, for those new to this move, get the form perfect first is the message: there's a LOT of neuro-muscular adaptation in this move that will work you out without anything in your hand, fear not.
Here's a review of the complete TGU as illustrated by RKC Team Lead Dr. Mark Cheng at the CK-FMS workshop
(1) start rolled full length on the side to grasp the bell with both hands


 (8) With your left foot leg on the ground, bring your right leg back through - work to get this pull through as even as possible - so that you get your knee down behind you and your hip lined up with that hand on the ground. Left knee still up.
update/note April 09: there's been some debate about whether or not or why or why not this hip thrust is the right thing to do in a TGU. There's a discussion/analysis of at least some of that debate in an accompanying post on the high hip bridge, here.
 * Added Note: Windmill hinge vs Windshield Wiper Crouch.
At the CK-FMS, this position caused considerable discussion. You'll note Doc is almost in a crouch here and the right leg is doing what came to be called a "wind shield wiper move" with the right foot almost aligning behind the left foot.
Here are comments from Andrea Chang, RKC, based on discussions of this posture with Pavel, Andrea du Cane, Gray Cook and Mark Cheng (quoted with permission):
Back to the sequence: So now you're kneeling on one knee, with one hand on the ground, arm straight and the other arm up with the KB. Note alignment of hand by side
(9) Get your hand off the ground so you're now in a genuflecting position. You are not using the hand on the ground to give you a boost up: this is a controlled movement of the torso into an upright position. If you cannot get to that upright position smoothly, that's another sign of work to do.
 (10) put your weight on that forward leg (the left leg with the foot firmly planted on the ground), you can look straight ahead now, and stand up. No hesitancy, just right up. The shoulder with the bell should be sucked down into the socket, the lats fired holding up that kettlebell. If it's difficult to get to that standing position in one step, work to do there, too.
 * Now reverse.
back into kneel

 leg back through and hip up
 lower butt, leg extending out, arm on ground extended and hand by hip
 lower to elbow

 bring the bell down to the chest (no photo - sorry)
roll to side with bell

The goal in part is to get this to be a crisp sequence of steps that can be broken down into individual units and then flowed into one motion.
1. kb to chest
2. press up bell
3. arm to side
4. roll to side
5. on elbow
6. on hand
7. hips up
8. leg back to kneel prep
9. torso erect in genuflect
10. Stand up
reverse.
Throughout, stay in a straight line all the way up: so the direction you start the TGU in is the direction you end in.
Putting it all together, here is Mark carrying out the "bottom's up" version of the TGU (can you see the small differences? also note the windshield wiper move going from bridge to genuflect to standing, rather than windmill hinge):
The problems we attended were:
- the extended leg leaving the ground
- The bent knee caving in
- inability to lower to do a controlled lower of hand to ground from genuflect or to get up to
-genuflect from hand on ground
- difficulty with hip extension
Each of these issues maps to a corresponding stability and/or mobility issue that comes out in the FMS (pdf overview here). That's pretty cool. It's interesting to see that sometimes simply cleaning up form (position of hand relative to hip) has an major influence on performance. Or sometimes other work needs to be done. Regardless, we all knew the TGU was a powerful as a move in its own right; now we know it's powerful as a diagnostic tool as well.
As always, if moves like this are new to you, find an RKC in your neighborhood and ask them to check your form: a post is no replacement for a skilled set of eyeballs - especially those training up now with the CK-FMS.
Thanks to Andrea Chang for synthesizing the discussion on Position 4/photos 8 & 12
(April 09: update on Position 4, the High Hip Bridge debate here)
(april 09, two: update on TGU as Diagnostic compared with FMS more questions than answers)
and just to be explicit, the following has now been captured in incredible step by step detail, with corrective drills, in the Kalos Sthenos DVD/Manual, touched on in the above two links.
There have been a number of posts of late on the various RKC sites commenting on how the Turkish Get Up has evolved as a move at the RKC.For folks not familiar with it, the Turkish Get Up is a great full body move that asks a person to go from a supine position to a standing position and back down again with a weight held in a fully extended arm. To achieve this work, just about everything is involved at some point in the move. It's been adopted into a suite of core kettlebell moves. This is why most recently Gray Cook and Brett Jones have been talking about it as a great diagnostic move too for calisthenics or beautiful movement.
There are numerous variations of this form with kettlebells, but over the past year or so, it has settled into a crisp clear execution of form designed to work the full body very well. While there is some debate about who/when this form was evolved, it's the one Hard Style is promoting, and for good reason. The illustrations following are of Dr. Mark Cheng, the person who wrote the latest RKC certification manual section on the Turkish Get Up.
As Brett Jones has said, this version of the TGU is not meant to replace any other TGU version, but it is an excellent diagnostic for showing where weaknesses may be. Combine this with the Functional Movement Screen, and we can see where there are stability or mobility issues and how to address them. If the TGU improves, the methods were effective; if it gets worse, need to check again what's up.
As a general technique, it is also strongly recommended that TGU's are practiced naked to start with (ie nothing in your hands), then work up to balancing a shoe on the flat of the palm to ensure excellent arm positioning and body awareness,THEN think about weight. At the recent Certified Kettlebell Functional Movement Specialist workshop (review here), Brett Jones ended up calling the Naked TGU + Shoe the Extreme TGU. In our group where we decided to go naked + shoe (before it was called "extreme"), Tom Nunn and i personally found that using the shoe gave us a focus for our raised arm without unduly fatiguing us with weight while we were frequently pausing and repeating moves to interrogate what might be happening with form.
Indeed, for those new to this move, get the form perfect first is the message: there's a LOT of neuro-muscular adaptation in this move that will work you out without anything in your hand, fear not.
Here's a review of the complete TGU as illustrated by RKC Team Lead Dr. Mark Cheng at the CK-FMS workshop
(1) start rolled full length on the side to grasp the bell with both hands
(2) then you're rolled flat on back with KB to chest (no photo)
(3) press up the bell with both hands straight up
(4) if the bell is going to be held with the left, bring the right arm down at 30-45 degrees to your body so that your hand is in line with your hip - this hip/hand alignment is critical: notice for now where the knee is: it is upright rather than collapsing in. Keep it there. That hand by the hip will help that in the rest of the moves.
(5) Go up on your right elbow from that position (keep the KB left arm straight). Again, notice the knee: upright, rather than collapsing in. Also, that right leg did not leave the ground while getting up onto the elbow. If it does leave the ground, that's another sign of work to do.
(6) then go up on your right hand - note hand position still close by hip
(7) then PRESS UP YOUR HIPS - you're on your side remember, so you have a line through your nice straight body at this point with the kb straight up, and you balanced on the other hand. Lats are fired on both sides. make sure to feel you lats working. If this hip elevation position is an issue, that's another sign of another issue for work.
update/note April 09: there's been some debate about whether or not or why or why not this hip thrust is the right thing to do in a TGU. There's a discussion/analysis of at least some of that debate in an accompanying post on the high hip bridge, here.
At the CK-FMS, this position caused considerable discussion. You'll note Doc is almost in a crouch here and the right leg is doing what came to be called a "wind shield wiper move" with the right foot almost aligning behind the left foot.
Here are comments from Andrea Chang, RKC, based on discussions of this posture with Pavel, Andrea du Cane, Gray Cook and Mark Cheng (quoted with permission):
looking at the pictures in your blog again, photo 8 [above -mc] shows the transition from the hips up bridge to the kneeling position, where mark sweeps his leg back and places his knee near his hand. in photo #8, his knee is further back than usual and he is crouching, showing more flexion in the knee on the ground. what i heard was that this is due to his particular martial art -- which movement's of helped him to develop this move -- however, the consensus was that the crouch was too pronounced. whether or not you need to do a windshield wiper move with your leg to help get in a more stable position is determined by your own body mechanics, it is not manditory as far as i understand.
the knee should be closer to the hand on the ground, allowing for the body to be in a more open hips forward stance, with an elongated spine, packed shoulders and zipped up core (yup i said core).
using the windmill technique to get out of, or back into, position #4 (photo #8 in mc's blog) is preferable to the crouch, and what eventually agreed upon at the ck-fms. note of caution, the hinge at the hips for the windmill technique can be cheated by novices/students by allowing the hand they place on the ground to go down rather quickly with a thump -- this is not desired. a controlled descent is what they're after.
Back to the sequence: So now you're kneeling on one knee, with one hand on the ground, arm straight and the other arm up with the KB. Note alignment of hand by side
(9) Get your hand off the ground so you're now in a genuflecting position. You are not using the hand on the ground to give you a boost up: this is a controlled movement of the torso into an upright position. If you cannot get to that upright position smoothly, that's another sign of work to do.
back into kneel
hand down by hip - maintaining control, not falling over onto the hand but deliberately lowering hand by hip (for those who know the move, think hinge from Windmill).
lower to back
both hands on bell to bring it down to the chestroll to side with bell
The goal in part is to get this to be a crisp sequence of steps that can be broken down into individual units and then flowed into one motion.
1. kb to chest
2. press up bell
3. arm to side
4. roll to side
5. on elbow
6. on hand
7. hips up
8. leg back to kneel prep
9. torso erect in genuflect
10. Stand up
reverse.
Throughout, stay in a straight line all the way up: so the direction you start the TGU in is the direction you end in.
Putting it all together, here is Mark carrying out the "bottom's up" version of the TGU (can you see the small differences? also note the windshield wiper move going from bridge to genuflect to standing, rather than windmill hinge):
The problems we attended were:
- the extended leg leaving the ground
- The bent knee caving in
- inability to lower to do a controlled lower of hand to ground from genuflect or to get up to
-genuflect from hand on ground
- difficulty with hip extension
Each of these issues maps to a corresponding stability and/or mobility issue that comes out in the FMS (pdf overview here). That's pretty cool. It's interesting to see that sometimes simply cleaning up form (position of hand relative to hip) has an major influence on performance. Or sometimes other work needs to be done. Regardless, we all knew the TGU was a powerful as a move in its own right; now we know it's powerful as a diagnostic tool as well.
As always, if moves like this are new to you, find an RKC in your neighborhood and ask them to check your form: a post is no replacement for a skilled set of eyeballs - especially those training up now with the CK-FMS.
Thanks to Andrea Chang for synthesizing the discussion on Position 4/photos 8 & 12
photos © mc, 2008
Tweet
Follow @begin2dig
Thursday, August 14, 2008
Electronic Auto Meditation, it's good for ya: review centerpointe holosync meditation cds
Follow @mcphoo
Tweet
I've been asked a few times now about Centerpointe's meditation CD's - what i thought of them, how they seem to work or not and are they worth the cost. So this is a light touch review of Centerpointe Holosync Audio Meditation Series.
The premise of the disks is that a big chunk of meditation is getting the brain into a meditative state - and that when folks measure meditators, what they see in their brain state are slow theta brain waves. Usually, these states take years to learn how to accomplish. The approach used by centerpointe, based on decades of research in this space, can be flipped on automatically. And it can. Really - it's almost like electrical muscle stimulation, but with the brain via audio cues.
So why would an athlete - or anyone working out - care about electronically induced meditative states?
Here's what i wrote about them awhile ago when i first encountered this approach:
That was almost a year ago - i did indeed continue to use this approach. Now this is interesting: the approach is designed to start at one frequency and then keep going with lower frequencies to induce deeper brain waves, so over a several year period you could work through 12 levels.
Here's the thing: when you're doing it - at least when i'm listening to these disks - i don't necessarily feel any different than not. But then, think about it: when we're asleep, do we feel "gee whiz i'm getting some deep rest" - the effect seems to be after the fact: am i feeling more centered, ready to get going.
Interesting to me, i also experienced some of the personally unsettling effects that the producers of this material suggest is possible. I won't go into why that happens, but as with regular mediation, the deeper a person goes into themselves, the more they may have to confront.
Also, as with meditation, or a workout, regular practice is pretty important for most benefit. That said, i use the Level 1 disks sometimes not as designed: that is, rather than just sit up and listen via the headphones (has to be heard on headphones to get the beats), i will sometimes work on my computer while listening - that doesn't let you get as deep, but it feels good. I haven't rigged up an EEG yet to see what that does to the depth of the wave patterns but will be doing that in the coming months.
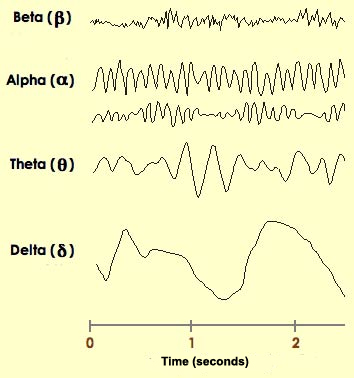
So, yes, i think these are a super cheap way (cheap as in, i don't need to spend a decade in a monastery to be able to achieve this wave pattern on my own) to get into a deep delta brain state for restoration.
Now, you can generate your own beats tracks: it's simply setting two frequencies, one in each ear that is off by sufficient hz such that the low frequency is the result. The thing is, however, centerpointe does a very good job of making these beat tracks, that are also covered with a decent meditaty sound track.
As you go up the levels, Centerpointe will also add subliminal messages in your own voice - positive affirmations - to these tracks - so you're getting "irradiated" by meditation.
I don't know the research in subliminal audio like i do on the beats side, so i'm reserving judgement about the effectiveness of this part of the program: you don't have to get these tracks made.
Let me reinforce that the first set of disks, the Awakening Prologue is good. If you use it regularly, you'll likely want to move to Level 1 within about 4-6 months.
Since starting with these beats, i don't always use them post a workout, but anytime during a day i can grab 30mins (or an hour). Being in transit, on a crowded train, is a perfect time for this: i'm sitting up - which is the recommended position - i have some great in-ear monitors, and i am zenning while all around is in cell phone turmoil.
Heal Heal Heal your CNS; assist body recovery; auto-meditate.
You can check this stuff out for free: click on this link to centerpointe or the swishy image below, and you can get a free disk that will give you a flavour of the beats experience.

Let me know what you think. Tweet Follow @begin2dig
The premise of the disks is that a big chunk of meditation is getting the brain into a meditative state - and that when folks measure meditators, what they see in their brain state are slow theta brain waves. Usually, these states take years to learn how to accomplish. The approach used by centerpointe, based on decades of research in this space, can be flipped on automatically. And it can. Really - it's almost like electrical muscle stimulation, but with the brain via audio cues.
So why would an athlete - or anyone working out - care about electronically induced meditative states?
Here's what i wrote about them awhile ago when i first encountered this approach:
One of the reasons i like the kettlebell approach to fitness is that it focuses almost as much on recovery as it does on the workouts themselves: don't recover properly, you effectively shoot yourself in the foot. While the P90X program, for instance, strongly encourages the use of its recovery drink after workouts, not much is said about rest/sleep where muscle building and healing takes place.
A tip i've heard repeatedly from strength trainers is the sooner after a workout you can get real rest/sleep, the better.
It's not always possible to catch a nap for 30+ minutes of deep sleep right after a workout. About a month ago, Mike Mahler pointed to Centerpointe's Meditation CD's. Their approach is to induce deeper brainwaves, getting down to deep sleep brainwaves (theta), by using a version on binaural beats. This beat approach to induce altered brainwave states is something colleagues of mine have used for studying knowledge acquisition, so it's not bogus: you can find papers about the approach. I've been trying it for about a month, just to boost the restoration phase because i travel alot and sleep is frequently disrupted.
I leave it for you to explore their site about all the great things this approach does for building new neural pathways.
My main interest is extra time in that optimal rest state for recovery/restoration as soon after a workout as possible. I'm not sure if the technique has been evaluated for muscle restoration, but i'm going to watch this approach for a few more months and see how it goes - that's why this part of the entry is an "aside" - early days yet, but because Mahler recommended it, it's worth a try. Worst case scenario, according to Centerpointe's research on participant effects: i become a better, more adjusted, creative, highly balanced person.
That was almost a year ago - i did indeed continue to use this approach. Now this is interesting: the approach is designed to start at one frequency and then keep going with lower frequencies to induce deeper brain waves, so over a several year period you could work through 12 levels.
Here's the thing: when you're doing it - at least when i'm listening to these disks - i don't necessarily feel any different than not. But then, think about it: when we're asleep, do we feel "gee whiz i'm getting some deep rest" - the effect seems to be after the fact: am i feeling more centered, ready to get going.
Interesting to me, i also experienced some of the personally unsettling effects that the producers of this material suggest is possible. I won't go into why that happens, but as with regular mediation, the deeper a person goes into themselves, the more they may have to confront.
Also, as with meditation, or a workout, regular practice is pretty important for most benefit. That said, i use the Level 1 disks sometimes not as designed: that is, rather than just sit up and listen via the headphones (has to be heard on headphones to get the beats), i will sometimes work on my computer while listening - that doesn't let you get as deep, but it feels good. I haven't rigged up an EEG yet to see what that does to the depth of the wave patterns but will be doing that in the coming months.
So, yes, i think these are a super cheap way (cheap as in, i don't need to spend a decade in a monastery to be able to achieve this wave pattern on my own) to get into a deep delta brain state for restoration.
Now, you can generate your own beats tracks: it's simply setting two frequencies, one in each ear that is off by sufficient hz such that the low frequency is the result. The thing is, however, centerpointe does a very good job of making these beat tracks, that are also covered with a decent meditaty sound track.
As you go up the levels, Centerpointe will also add subliminal messages in your own voice - positive affirmations - to these tracks - so you're getting "irradiated" by meditation.
I don't know the research in subliminal audio like i do on the beats side, so i'm reserving judgement about the effectiveness of this part of the program: you don't have to get these tracks made.
Let me reinforce that the first set of disks, the Awakening Prologue is good. If you use it regularly, you'll likely want to move to Level 1 within about 4-6 months.
Since starting with these beats, i don't always use them post a workout, but anytime during a day i can grab 30mins (or an hour). Being in transit, on a crowded train, is a perfect time for this: i'm sitting up - which is the recommended position - i have some great in-ear monitors, and i am zenning while all around is in cell phone turmoil.
Heal Heal Heal your CNS; assist body recovery; auto-meditate.
You can check this stuff out for free: click on this link to centerpointe or the swishy image below, and you can get a free disk that will give you a flavour of the beats experience.
Let me know what you think. Tweet Follow @begin2dig
Subscribe to:
Posts (Atom)
 COACHING with dr. m.c.